Creating a Cross-account IAM Role for QDS
Qubole allows you to configure a cross-account IAM role as an alternative to access keys to interact with AWS resources.
Configuring the Qubole Data Service provides a detailed step-by-step procedure on how to go about creating IAM roles on the AWS end as well as the Qubole end.
To get a cross-account IAM role, you must perform the following steps.
- Obtaining the Qubole AWS Account ID and External ID
- Creating an Amazon EC2 Policy
- Creating an Amazon S3 Policy
- Creating an IAM Service Role
- Creating an Amazon Cross-account Policy
- Updating the Cross-account Policy for an IAM Role
- Updating IAM Role Trust Relationships
Note
Qubole and qubole are reserved by Qubole. Do not use them in any AWS configuration.
For more information, see Qubole Cluster EC2 Tags (AWS).
Choosing between a Cross-account IAM Role and Dual IAM Roles highlights the difference between the cross-account IAM role-based authentication and the dual IAM roles-based authentication.
Obtaining the Qubole AWS Account ID and External ID
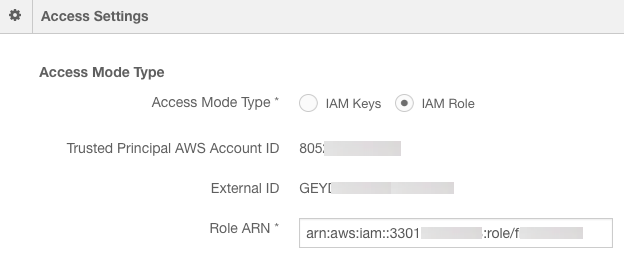
Managing Roles explains IAM-roles-access mode in a Qubole account. Select the IAM roles access mode in the Qubole account settings. Note down the Qubole AWS Account ID and External ID.
Creating an Amazon EC2 Policy
To create an Amazon EC2 policy, perform the following steps:
- Log in to AWS Console through console.aws.amazon.com.
- Navigate to the Identity and Access Management interface.
- Navigate to the Policies interface within the Identity and Access Management interface.
- Click Create Policy.
- Click Create Your Own Policy.
- Enter a Policy Name for the Amazon EC2 policy.
- Provide a Policy Description.
- For the Policy Document, use one of the following samples and update the text as required.
Here are two sample IAM templates for Amazon EC2 settings.
Sample 1 - This is a sample AWS policy for sample EC2 settings.
{
"Version": "2012-10-17",
"Statement": [
 {
     "Effect": "Allow",
     "Action": [
             "ec2:AuthorizeSecurityGroupEgress",
             "ec2:AuthorizeSecurityGroupIngress",
             "ec2:AttachVolume",
             "ec2:CancelSpotInstanceRequests",
             "ec2:CreateSecurityGroup",
             "ec2:CreateTags",
             "ec2:CreateVolume",
             "ec2:DeleteSecurityGroup",
             "ec2:DeleteTags",
             "ec2:DeleteVolume",
             "ec2:Describe*",
             "ec2:DescribeVolumes",
             "ec2:DetachVolume",
             "ec2:ImportKeyPair",
             "ec2:DescribeKeyPairs",
             "ec2:ModifyInstanceAttribute",
             "ec2:RequestSpotInstances",
             "ec2:RevokeSecurityGroupIngress",
             "ec2:RunInstances",
             "ec2:StartInstances",
             "ec2:StopInstances",
             "ec2:TerminateInstances",
             "ec2:RequestSpotFleet",
             "ec2:DescribeSpotFleetInstances",
             "ec2:DescribeSpotFleetRequests",
             "ec2:DescribeSpotFleetRequestHistory",
             "ec2:CancelSpotFleetRequests",
             "iam:PassRole",
             "iam:ListRoles",
             "iam:GetRole",
             "iam:ListInstanceProfiles",
             "iam:SimulatePrincipalPolicy",
             "ec2:CreateFleet",
             "ec2:DeleteLaunchTemplate",
             "ec2:DeleteLaunchTemplateVersions",
             "ec2:CreateLaunchTemplateVersion",
             "ec2:CreateLaunchTemplate",
             "ec2:DescribeLaunchTemplates",
             "ec2:DescribeLaunchTemplateVersions"
             ],
     "Resource": ["*"]
     },
     {
     "Effect": "Allow",
     "Action": [
             "ec2:CreateNetworkInterface",
             "ec2:DetachNetworkInterface",
             "ec2:DescribeNetworkInterfaces",
             "ec2:DescribeNetworkInterfaceAttribute",
             "ec2:ModifyNetworkInterfaceAttribute",
             "ec2:DeleteNetworkInterface",
             "ec2:AttachNetworkInterface"
     ],
     "Resource": "*"
     },
     {
     "Effect": "Allow",
     "Action": ["sts:DecodeAuthorizationMessage"],
     "Resource": ["*"]
    },
    {
    "Effect": "Allow",
    "Action": [
             "iam:CreateServiceLinkedRole",
             "iam:PutRolePolicy"
    ],
    "Resource": ["arn:aws:iam::*:role/aws-service-role/spot.amazonaws.com/AWSServiceRoleForEC2Spot", "arn:aws:iam::*:role/aws-service-role/spotfleet.amazonaws.com/AWSServiceRoleForEC2SpotFleet"],
    "Condition": {
       "StringLike": {
           "iam:AWSServiceName": ["spot.amazonaws.com","spotfleet.amazonaws.com"]
         }
       }
      }
    ]
 }
Sample 2 - Here is a sample with more restrictive policy permissions that:
- Limits RunInstances, CreateTags, DeleteTags to a particular VPC (supported by
vpc/<vpc-id>).- Only terminates instances that are brought up (based on the instance profile).
- Only authorizes SG ingress/egress for SGs created by Qubole (via tag).
- Supports EBS Upscaling (supported by policy elements containing
Volume). Sample Policy for EBS Upscaling provides the exact policy elements required for EBS Upscaling.- Supports heterogenity in clusters (supported by
SpotFleetcontaining-policy elements). AWS Considerations provides more information.- Includes policy elements containing
Rolethat are applicable to IAM roles.
{
"Version": "2012-10-17",
"Statement": [
 {
     "Sid": "NonResourceBasedPermissions",
     "Effect": "Allow",
     "Action": [
             "ec2:AssociateAddress",
             "ec2:DisassociateAddress",
             "ec2:ImportKeyPair",
             "ec2:RequestSpotInstances",
             "ec2:RequestSpotFleet",
             "ec2:ModifySpotFleetRequest",
             "ec2:CancelSpotFleetRequests",
             "ec2:CancelSpotInstanceRequests",
             "ec2:CreateSpotDatafeedSubscription",
             "ec2:DeleteSpotDatafeedSubscription",
             "ec2:Describe*",
             "ec2:CreateKeyPair",
             "ec2:CreateSecurityGroup",
             "ec2:CreateTags",
             "ec2:CreateFleet",
             "ec2:DeleteLaunchTemplate",
             "ec2:DeleteLaunchTemplateVersions",
             "ec2:CreateLaunchTemplateVersion",
             "ec2:CreateLaunchTemplate",
             "ec2:DescribeLaunchTemplates",
             "ec2:DescribeLaunchTemplateVersions",
             "sts:DecodeAuthorizationMessage",
             "iam:SimulatePrincipalPolicy"
             ],
     "Resource": ["*"]
     },
 {
     "Sid": "AllowInstanceActions",
     "Effect": "Allow",
     "Action": [
            "ec2:StartInstances",
            "ec2:StopInstances",
            "ec2:ModifyInstanceAttribute",
            "ec2:TerminateInstances",
            "ec2:AttachVolume",
            "ec2:DetachVolume",
            "ec2:CreateTags",
            "ec2:DeleteTags"
            ],
     "Resource": "arn:aws:ec2:<AWS Region>:<AWS Account ID>:instance/*",
     "Condition": {
         "StringLike": {
                "ec2:InstanceProfile": "arn:aws:iam::<AWS Account ID>:instance-profile/<AWS Role Name>"
                }
         }
     },
 {
     "Sid": "RunInstanceWithRole",
     "Effect": "Allow",
     "Action": [
            "ec2:RunInstances",
            "ec2:CreateTags",
            "ec2:DeleteTags"
            ],
     "Resource": [
            "arn:aws:ec2:<AWS Region>:<AWS Account ID>:launch-template/*",
            "arn:aws:ec2:<AWS Region>:<AWS Account ID>:instance/*"
            ],
     "Condition": {
          "StringLike": {
                "ec2:InstanceProfile": "arn:aws:iam::<AWS Account ID>:instance-profile/<AWS Role Name>"
                 }
          }
     },
 {
     "Sid": "RunInstanceInSubnet",
     "Effect": "Allow",
     "Action": [
            "ec2:RunInstances",
            "ec2:CreateTags",
            "ec2:DeleteTags"
            ],
     "Resource": ["arn:aws:ec2:<AWS Region>:<AWS Account ID>:subnet/*"],
     "Condition": {
          "StringLike": {
                "ec2:vpc": "arn:aws:ec2:<AWS Region>:<AWS Account ID>:vpc/*"
                }
          }
     },
 {
     "Sid": "RunInstanceResourcePermissions",
     "Effect": "Allow",
     "Action": [
            "ec2:RunInstances",
            "ec2:CreateTags",
            "ec2:DeleteTags",
            "ec2:AuthorizeSecurityGroupIngress",
            "ec2:AuthorizeSecurityGroupEgress"
            ],
    "Resource": [
            "arn:aws:ec2:<AWS Region>::image/*",
            "arn:aws:ec2:<AWS Region>::snapshot/*",
            "arn:aws:ec2:<AWS Region>:<AWS Account ID>:volume/*",
            "arn:aws:ec2:<AWS Region>:<AWS Account ID>:network-interface/*",
            "arn:aws:ec2:<AWS Region>:<AWS Account ID>:key-pair/*",
            "arn:aws:ec2:<AWS Region>:<AWS Account ID>:security-group/*",
            "arn:aws:ec2:<AWS Region>:<AWS Account ID>:launch-template/*"
            ]
    },
 {
    "Sid": "SecurityGroupActions",
    "Effect": "Allow",
    "Action": [
            "ec2:AuthorizeSecurityGroupEgress",
            "ec2:AuthorizeSecurityGroupIngress",
            "ec2:RevokeSecurityGroupIngress",
            "ec2:RevokeSecurityGroupEgress",
            "ec2:DeleteSecurityGroup",
            "ec2:CreateTags",
            "ec2:DeleteTags"
            ],
    "Resource": ["*"],
    "Condition": {
         "StringLike": {
               "ec2:vpc": "arn:aws:ec2:<AWS Region>:<AWS Account ID>:vpc/*"
               }
         }
    },
 {
    "Sid": "CreateAndDeleteVolumeActions",
    "Effect": "Allow",
    "Action": [
            "ec2:CreateVolume",
            "ec2:DeleteVolume",
            "ec2:CreateTags",
            "ec2:DeleteTags"
            ],
    "Resource": "arn:aws:ec2:<AWS Region>:<AWS Account ID>:volume/*"
    },
 {
    "Effect": "Allow",
    "Action": [
            "iam:CreateServiceLinkedRole",
            "iam:PutRolePolicy"
            ],
    "Resource": [
             "arn:aws:iam::*:role/aws-service-role/spot.amazonaws.com/AWSServiceRoleForEC2Spot",
             "arn:aws:iam::*:role/aws-service-role/spotfleet.amazonaws.com/AWSServiceRoleForEC2SpotFleet"
             ],
    "Condition": {
         "StringLike": {
                "iam:AWSServiceName": [
                       "spot.amazonaws.com",
                       "spotfleet.amazonaws.com"
                       ]
                }
         }
    },
 {
    "Effect": "Allow",
    "Action": [
            "ec2:CreateNetworkInterface",
            "ec2:DetachNetworkInterface",
            "ec2:DescribeNetworkInterfaces",
            "ec2:DescribeNetworkInterfaceAttribute",
            "ec2:ModifyNetworkInterfaceAttribute",
            "ec2:DeleteNetworkInterface",
            "ec2:AttachNetworkInterface"
            ],
    "Resource": "*"
    },
 {
     "Effect": "Allow",
     "Action": [
            "iam:PassRole",
            "iam:GetRole"
            ],
     "Resource": "arn:aws:iam::<AWS Account ID>:role/qubole-ec2-spot-fleet-role"
     }
  ]
}
Note
Mention the corresponding AWS region that is represented by <aws-region> in the above sample.
- Click Create Policy.
Note
The asterisk (*) in the first line under Resource indicates all EC2 resources.
Creating an Amazon S3 Policy
Perform the following steps to create an Amazon S3 Policy:
- Navigate to the Identity and Access Management interface.
- Navigate to the Policies interface within the Identity and Access Management interface.
- Click Create Policy.
- Click Create Your Own Policy.
- Enter a Policy Name for the Amazon S3 policy.
- Provide a Policy Description.
- For the Policy Document, use the following code and update the text as required.
{
 "Version": "2012-10-17",
 "Statement": [
                {
                  "Effect": "Allow",
                  "Action": [
                              "s3:DeleteObject",
                              "s3:GetObject",
                              "s3:GetObjectAcl",
                              "s3:PutObject",
                              "s3:PutObjectAcl",
                              "s3:GetBucketAcl",
                              "s3:GetBucketLocation",
                              "s3:ListBucket"
                            ],
                  "Resource": [
                                "arn:aws:s3:::<bucketpath>/*",
                                "arn:aws:s3:::<bucketpath>/",
                                "arn:aws:s3:::<bucketpath>"
                              ]
                },
                {
                  "Effect": "Allow",
                  "Action": [
                              "s3:GetObject",
                              "s3:ListBucket",
                              "s3:GetBucketLocation"
                            ],
                  "Resource": [ "*" ]
                },
                {
                  "Effect": "Allow",
                  "Action": [
                              "s3:ListAllMyBuckets"
                            ],
                  "Resource": [ "*" ]
                }
              ]
}
Note
In the above policy example, replace the bucketpath. Ensure that Amazon S3 buckets are existing/created before
populating the bucketpath in the policy. Amazon S3 buckets must be local to the clusters that are created. If
there are multiple buckets, list them as bucketpath references as shown in the above sample policy.
Users of an account must be allowed access to the default Amazon S3 bucket location that is configured in
Configuring your Access Settings using IAM Roles. This is represented by the policy Action element s3:GetBucketLocation,
which is applicable at the S3 level ( arn:aws:s3:::* ) or account-level ( * ) but not at the bucket resource level.
- Click Create Policy.
Note
The asterisk (*) after the slash (/) in the first line under Resource indicates all sub directories stored in the location provided to the left of the slash (/).
Creating an IAM Service Role
Perform the following steps to create an IAM role and set required permissions for configuring an IAM role on QDS:
Note
The AWS UI wizard may subject to change as per AWS requirements.
- Sign in to the AWS Management Console and navigate to the Identity and Access Management interface at https://console.aws.amazon.com/iam/.
- Navigate to the Roles Interface and select Create New Role. Enter a role name and select Next.
- Within Select Role Type, select AWS Service Roles. Select Amazon EC2 within AWS Service Roles.
- Select the Amazon EC2 and S3 policies. Click Next.
- Note down the Role ARN value that you need to enter in the Qubole account settings tab. See Configuring your Access Settings using IAM Roles for more information. Select Create Role.
Creating an Amazon Cross-account Policy
Important
If you are configuring Dual IAM roles, ensure that the two “Resource” references in the policy below point to the ARN of the Secondary IAM instance profile or role respectively, and not the Service IAM instance profile or role.
Perform the following steps to create an Amazon cross-account policy:
- Navigate to the Identity and Access Management interface.
- Navigate to the Policies interface within the Identity and Access Management interface.
- Click Create Policy.
- Click Create Your Own Policy.
- Enter a Policy Name for the cross-account policy.
- Provide a Policy Description.
- For the Policy Document, use the following code and update the text as required.
{
 "Version": "2012-10-17",
 "Statement": [
               {
                 "Effect": "Allow",
                 "Action": "iam:GetInstanceProfile",
                 "Resource": "arn:aws:iam::<arn_number>:instance-profile/<role_name>"
               },
               {
                 "Effect": "Allow",
                 "Action": "iam:PassRole",
                 "Resource": "arn:aws:iam::<arn_number>:role/<role_name>"
               }
              ]
}
Note
In the above policy example, replace the arn_number and role_name.
- Click Create Policy.
Updating the Cross-account Policy for an IAM Role
Perform the following steps to update a cross-account policy in the IAM role:
- Navigate to the Identity and Access Management interface.
- Navigate to the Roles interface within the Identity and Access Management interface.
- Click the role that was previously created.
- Click Attach a Policy.
- Click the Cross Account Policy.
- Click Attach Policy.
Updating IAM Role Trust Relationships
Perform the following steps to update trust relationships of the newly created Amazon IAM service role:
- Navigate to the Identity and Access Management interface.
- Navigate to the Roles interface within the Identity and Access Management interface.
- Click the new cross-account IAM role.
- Click the Trust Relationships tab.
- Click Edit Trust Relationships.
- For the Policy Document, use the following code and update the text as required.
{
"Version": "2012-10-17",
"Statement": [
   {
   "Effect": "Allow",
   "Principal": {
                 "Service": "ec2.amazonaws.com"
                },
   "Action": "sts:AssumeRole"
   },
   {
   "Effect": "Allow",
   "Principal": {"AWS": "arn:aws:iam::<quboleawsaccountid>:root"},
   "Action": "sts:AssumeRole",
   "Condition": {"StringEquals": {"sts:ExternalId":["<externalid1>", "<externalid2>"]}}
   }
   ]
}
Note
In the above policy example, replace the quboleawsaccountid and externalid1 and externalid2 for
two different QDS environments. This allows you to use a single IAM role for various QDS
environments. To use the IAM role for a single QDS environment, specify the external ID of that QDS
environment-IAM role account.
- After editing, click Update Trust Policy to save changes.
- Return to Qubole UI. Enter the Role ARN and default location in Account Settings. See Access Mode for more information on IAM roles and Role ARN.