Creating Notification Channels
You can create Notification Channels (such as Email, Slack, PagerDuty, and Webhook) to receive notifications on success or failure of various Qubole products (Scheduler, Quest, and so on). To create Notification Channels, follow the instructions below:
Navigate to the Control Panel page and click Notification Channels.

Click +New. The Notification Channels window is displayed.
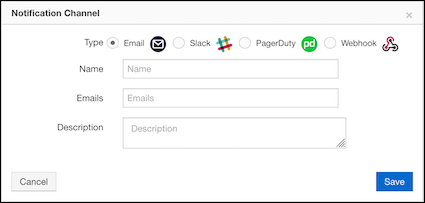
Select the channel type and specify the required details.
Note
- Email: You can select Email to configure email notifications. Enter the name, email ids (comma-separated), and description in the Name, Emails, and Description fields, respectively.
- Slack: You can configure Slack to receive notifications through Slack messages. Enter the name, webhook URL, and description in the Name, Webhook, and Description fields respectively.
- PagerDuty: You can configure PagerDuty to receive notifications through PagerDuty. Enter the name, secret key to authorise the PagerDuty’s event API call, and description in the Name, Secret, and Description fields respectively.
- Webhook: You can select Webhook to configure other services which support webhook to receive notifications. Enter the name, webhook URL, and description in the Name, Webhook, and Description fields respectively.
Click Save. You have successfully configured a Notification Channel.
You can click the settings icon at right to perform the following activities:
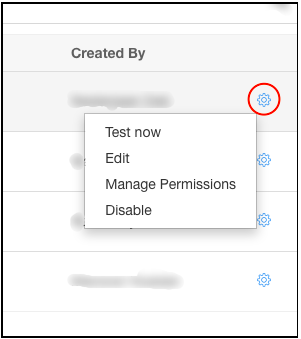
- Test Now: You can test your channel with this option. After you click Test Now, you will receive a test email at your email address.
- Edit: You can click Edit to edit your configuration. After you finish editing, click Save.
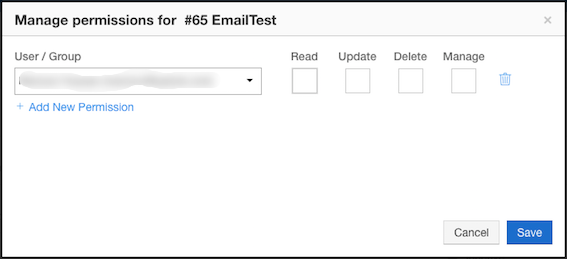
- Manage Permissions: Click Manage Permissions to manage user access. After you click Manage Permissions, the Manage Permissions window is displayed. Select the User or Group from the list and add the permissions. To add multiple permissions, click Add New Permission. You can also click the delete icon to delete any entry. Click Save at the end.
- Disable: You can click Disable to disable any notification channel. After you click Disable, enter alternate email id (optional) and click Save. After disabling, notification on the success or failure of the configured Qubole products will be sent to the mentioned alternate email id. Along with that, it will also say that the primary notification channel is disabled.