Configuring the ODBC Driver
You can change the connection settings from the iODBC Administrator64 that is part of the iODBC Driver Manager or by
editing the odbc.ini file. The following subtopics the configuration-related information:
Note
In JDBC and ODBC driver configurations, https://api.qubole.com is the default endpoint.
Prerequisites
These are the prerequisites:
Ensure that you have the access to the object/resource that you refer to in the driver configuration. If you see an access denied error, check with the Qubole account administrator. For more information, see Resources, Actions, and What they Mean.
Configuring the Driver through the iODBC Manager
Ensure that the iODBC Driver Manager is installed on the Mac as described in Installing the ODBC Driver on Mac.
Perform these steps to configure the ODBC driver:
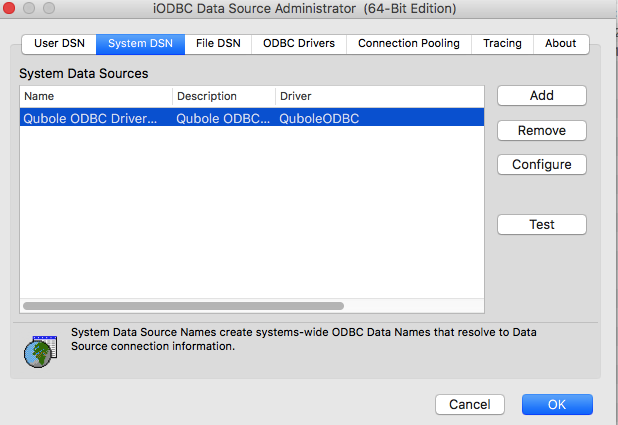
Open iODBC Administrator64 with Administrator Privileges. (
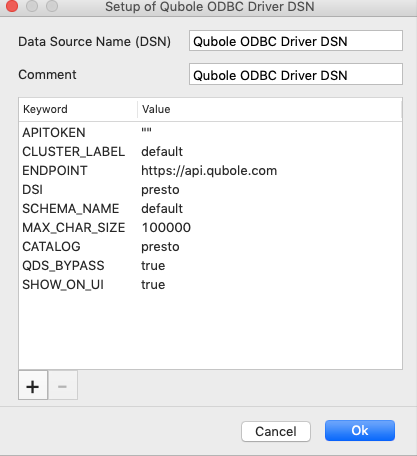
sudo /Applications/iODBC/iODBC\ Administrator64.app/Contents/MacOS/iODBC\ Administrator64)Go to System DSN and select Qubole ODBC Driver DSN and the dialog is illustrated here.

Click Configure.
Enter the valid API Token. Managing Your Accounts provides more information on the API tokens.
Add
Prestoas the DSI value and it is the only supported value.Add the MAX_CHAR_SIZE keyword and add a value if you do not want to use the default value, which is 100000.
However, some tools require the maximum value to be set below a particular limit.
Example: For Microsoft SQL Server, this value has to be set to 8000 or less than 8000.
Add SCHEMA_NAME as a keyword and enter the schema name as its value, to filter to that schema while fetching metadata so that only the related
TABL_SCHEMconfigured is exposed.Add CATALOG as a keyword and enter the catalog’s name as its value.
QDS_BYPASS: This property is only applicable to the third-generation ODBC driver’s QDS bypass mode.
Note
Currently, this property only applies to AWS. Do not set this option for the Azure cloud endpoint, azure.qubole.com.
By default, this property is set to
trueto allow the driver to directly communicate with Presto master for submitting commands and fetching results. If you disable this property, then the driver behaves as the ODBC driver in the legacy mode.SHOW_ON_UI: This property is only applicable to the third-generation ODBC driver’s QDS bypass mode. By default, this property is set to
trueto display the queries on Qubole’s UI. It returnsQueryHistIDas part of the error message for queries executed through the third-generation ODBC driver.The Configure dialog box is as illustrated here with the virtual-host-style URLs disabled and path-style URLs enabled for S3 buckets.

Click OK.
Configuring the Driver through the ODBC.ini File
The Qubole ODBC driver comes with a DSN created that you can see in the the odbc.ini file. After you install the driver,
you can trace the odbc.ini file in the Library/ODBC/ location. You can add another DSN or modify the DSN details.
For the Qubole ODBC driver, these are the defaults in the odbc.ini file.
[ODBC]
# Specify any global ODBC configuration here such as ODBC tracing.

[ODBC Data Sources]
Qubole ODBC Driver DSN=QuboleODBC

[Qubole ODBC Driver DSN]
# This key is not necessary and is only to give a description of the data source.
Description=Qubole ODBC Driver DSN

# Driver: The location where the ODBC driver is installed to.
Driver=/Library/qubole/odbc/lib/universal/libquboleodbc.dylib
# APITOKEN: The API Token for the account to be used, as provided by Qubole.
APITOKEN=""
# CLUSTER_LABEL: The label of the cluster on which queries are to be run
CLUSTER_LABEL=default
# ENDPOINT: The endpoint for the account to be used, as provided by Qubole.
ENDPOINT=https://api.qubole.com
#DSI: The data source name is Presto. The third-generation ODBC driver for Mac only supports Presto.
DSI=presto
#Schema name
SCHEMA_NAME=default
# Catalog name
CATALOG=presto
#The QDS BYPASS mode is enabled by default
QDS_BYPASS=true
#SHOW_ON_UI is enabled by default
SHOW_ON_UI=true
In the odbc.ini file, you can edit any entry’s value. You can change these parameters as per the requirements:
APITOKEN: Enter The API token of the QDS account. Managing Your Accounts provides more information on the API tokens.CLUSTER_LABEL: The cluster label isdefault, which implies that it is default cluster of the account. You can change it by adding the cluster’s label that you want to use.ENDPOINT: It is the QDS environment. By default, it is https://api.qubole.com. To change it to a different QDS environment on which you have the QDS account, add that QDS environment as the endpoint. To know the endpoints, see Supported Qubole Endpoints on Different Cloud Providers.DSI: It is the Data Source Name. AddPrestoas theDSIvalue and it is the only supported value.SCHEMA_NAME: Enter the schema name as its value, to filter to that schema while fetching metadata so that only the relatedTABL_SCHEMconfigured is exposed.CATALOG: Add this property and enter the catalog’s name as its value.QDS_BYPASS: This property is only applicable to the third-generation ODBC driver’s QDS bypass mode. By default, this property is set totrueto allow the driver to directly communicate with Presto master for submitting commands and fetching results. If you disable this property, then the driver behaves as the ODBC driver in the legacy mode.SHOW_ON_UI: This property is only applicable to the third-generation ODBC driver’s QDS bypass mode. By default, this property is set totrueto display the queries on Qubole’s UI. It returnsQueryHistIDas part of the error message for queries executed through the third-generation ODBC driver.
QDS Bypass Mode of ODBC Driver Version 3.0 for Mac
The third-generation ODBC driver for Mac only supports the QDS_BYPASS mode.
The following table shows the supported/unsupported properties of the ODBC driver version 3.0 in the QDS-Bypass mode and the previous version 2.1.1.
Property Name |
Version 2.1.1 |
QDS-Bypass Mode in version 3 |
|---|---|---|
APITOKEN |

|

|
CLUSTER_LABEL |

|

|
ENDPOINT |

|

|
DSI |

|

|
APPID |

|

|
SCHEMA_NAME |

|

|
CATALOG |

|

|
USE_S3 |

|

|
BUCKET_REGION |

|

|
STREAM_RESULTS |

|

|
QDS_BYPASS (v3) |

|

|
SHOW_ON_UI (v3) |

|

|
Testing the Driver
To run a simple test:
Run the command:
'/Library/Application Support/iODBC/bin/iodbctest'(Make sure you include the single quotes, or the space between
ApplicationandSupportwill cause the command to fail.)In the command-line utility, enter
?to see a list of available data sources.At the prompt, enter
dsn=Qubole ODBC Driver DSNAt the
SQL>prompt, enter theSHOW TABLEScommand.
To test the driver with Microsoft Excel:
Open a new Excel Worksheet.
In Data tab, choose Select New Database Query from Database option.
Go to the System DSN tab and choose the appropriate driver, then click OK.
Leave the username and password blank if prompted, and click OK.