An Overview of Heterogeneous Nodes in Clusters
QDS supports heterogeneous Spark and Hadoop 2 clusters; this means that the worker nodes comprising the cluster can be of different instance types.
On AWS, QDS also supports heterogeneous Presto clusters.
The following subsections provide more information:
Note
For AWS, you need to configure additional permissions before you can use heterogeneous nodes. Such permissions are not needed for Azure or Oracle OCI.
AWS Considerations
Advantages for On-Demand and Spot Instances
Heterogeneity in On-Demand nodes is beneficial if the requested number of the primary worker instance type cannot be granted by AWS at that time.
Heterogeneity in Spot nodes is highly beneficial when either the Spot price of the primary worker instance type is higher than the Spot price specified in the cluster configuration, or the requested number of Spot nodes cannot be granted by AWS at that point of time. In general, configuring a heterogeneous cluster helps ensure you get the most cost-effective combination of instances, because QDS obtains the cheapest mix that meets your request. (For example, suppose you specify a larger instance with a weight of 2, and its hourly Spot price is $ n, and you also specify a smaller instance with a weight of 1 that provides resources that are at least half those of the larger instance, and its price is less than $1/2 n. In this case, QDS obtains two of the smaller instances, instead of one of the larger, and you save the cost difference.)
Additional Permissions
Apart from the permissions given to the credentials used in Qubole, additional permissions are required to use heterogeneous clusters. Proceed as follows to create them:
Create a new AWS policy and define the elements as given below.
  {
    "Version": "2012-10-17",
    "Statement": [
        {
            "Effect": "Allow",
            "Action": [
                "ec2:RequestSpotFleet",
                "ec2:CreateFleet",
                "ec2:DescribeSpotFleetInstances",
                "ec2:DescribeSpotFleetRequests",
                "ec2:DescribeSpotFleetRequestHistory",
                "ec2:CancelSpotFleetRequests",
                "ec2:DeleteLaunchTemplate",
                "ec2:DeleteLaunchTemplateVersions",
                "ec2:CreateLaunchTemplateVersion",
                "ec2:CreateLaunchTemplate",
                "ec2:DescribeLaunchTemplates",
                "ec2:DescribeLaunchTemplateVersions",
                "iam:PassRole",
                "iam:ListRoles",
                "iam:GetRole",
                "iam:ListInstanceProfiles"
            ],
            "Resource": [
                "*"
            ]
        },
        {
            "Effect": "Allow",
            "Action": [
                "iam:CreateServiceLinkedRole",
                "iam:PutRolePolicy"
            ],
            "Resource": [
                "arn:aws:iam::*:role/aws-service-role/spot.amazonaws.com/AWSServiceRoleForEC2Spot",
                "arn:aws:iam::*:role/aws-service-role/spotfleet.amazonaws.com/AWSServiceRoleForEC2SpotFleet"
            ],
            "Condition": {
                "StringLike": {
                    "iam:AWSServiceName": [
                        "spot.amazonaws.com",
                        "spotfleet.amazonaws.com"
                    ]
                }
            }
        }
    ]
}
For a more restrictive policy, refer to the following example:
{
 "Version": "2012-10-17",
 "Statement": [
  {
      "Sid": "NonResourceBasedPermissions",
      "Effect": "Allow",
      "Action": [
              "ec2:AssociateAddress",
              "ec2:DisassociateAddress",
              "ec2:ImportKeyPair",
              "ec2:RequestSpotInstances",
              "ec2:RequestSpotFleet",
              "ec2:ModifySpotFleetRequest",
              "ec2:CancelSpotFleetRequests",
              "ec2:CancelSpotInstanceRequests",
              "ec2:CreateSpotDatafeedSubscription",
              "ec2:DeleteSpotDatafeedSubscription",
              "ec2:Describe*",
              "ec2:CreateKeyPair",
              "ec2:CreateSecurityGroup",
              "ec2:CreateTags",
              "ec2:CreateFleet",
              "ec2:DeleteLaunchTemplate",
              "ec2:DeleteLaunchTemplateVersions",
              "ec2:CreateLaunchTemplateVersion",
              "ec2:CreateLaunchTemplate",
              "ec2:DescribeLaunchTemplates",
              "ec2:DescribeLaunchTemplateVersions",
              "sts:DecodeAuthorizationMessage",
              "iam:SimulatePrincipalPolicy"
              ],
      "Resource": ["*"]
      },
  {
      "Sid": "AllowInstanceActions",
      "Effect": "Allow",
      "Action": [
             "ec2:StartInstances",
             "ec2:StopInstances",
             "ec2:ModifyInstanceAttribute",
             "ec2:TerminateInstances",
             "ec2:AttachVolume",
             "ec2:DetachVolume",
             "ec2:CreateTags",
             "ec2:DeleteTags"
             ],
      "Resource": "arn:aws:ec2:<AWS Region>:<AWS Account ID>:instance/*",
      "Condition": {
          "StringLike": {
                 "ec2:InstanceProfile": "arn:aws:iam::<AWS Account ID>:instance-profile/<AWS Role Name>"
                 }
          }
      },
  {
      "Sid": "RunInstanceWithRole",
      "Effect": "Allow",
      "Action": [
             "ec2:RunInstances",
             "ec2:CreateTags",
             "ec2:DeleteTags"
             ],
      "Resource": [
             "arn:aws:ec2:<AWS Region>:<AWS Account ID>:launch-template/*",
             "arn:aws:ec2:<AWS Region>:<AWS Account ID>:instance/*"
             ],
      "Condition": {
           "StringLike": {
                 "ec2:InstanceProfile": "arn:aws:iam::<AWS Account ID>:instance-profile/<AWS Role Name>"
                  }
           }
      },
  {
      "Sid": "RunInstanceInSubnet",
      "Effect": "Allow",
      "Action": [
             "ec2:RunInstances",
             "ec2:CreateTags",
             "ec2:DeleteTags"
             ],
      "Resource": ["arn:aws:ec2:<AWS Region>:<AWS Account ID>:subnet/*"],
      "Condition": {
           "StringLike": {
                 "ec2:vpc": "arn:aws:ec2:<AWS Region>:<AWS Account ID>:vpc/*"
                 }
           }
      },
  {
      "Sid": "RunInstanceResourcePermissions",
      "Effect": "Allow",
      "Action": [
             "ec2:RunInstances",
             "ec2:CreateTags",
             "ec2:DeleteTags",
             "ec2:AuthorizeSecurityGroupIngress",
             "ec2:AuthorizeSecurityGroupEgress"
             ],
     "Resource": [
             "arn:aws:ec2:<AWS Region>::image/*",
             "arn:aws:ec2:<AWS Region>::snapshot/*",
             "arn:aws:ec2:<AWS Region>:<AWS Account ID>:volume/*",
             "arn:aws:ec2:<AWS Region>:<AWS Account ID>:network-interface/*",
             "arn:aws:ec2:<AWS Region>:<AWS Account ID>:key-pair/*",
             "arn:aws:ec2:<AWS Region>:<AWS Account ID>:security-group/*",
             "arn:aws:ec2:<AWS Region>:<AWS Account ID>:launch-template/*"
             ]
     },
  {
     "Sid": "SecurityGroupActions",
     "Effect": "Allow",
     "Action": [
             "ec2:AuthorizeSecurityGroupEgress",
             "ec2:AuthorizeSecurityGroupIngress",
             "ec2:RevokeSecurityGroupIngress",
             "ec2:RevokeSecurityGroupEgress",
             "ec2:DeleteSecurityGroup",
             "ec2:CreateTags",
             "ec2:DeleteTags"
             ],
     "Resource": ["*"],
     "Condition": {
          "StringLike": {
                "ec2:vpc": "arn:aws:ec2:<AWS Region>:<AWS Account ID>:vpc/*"
                }
          }
     },
  {
     "Sid": "CreateAndDeleteVolumeActions",
     "Effect": "Allow",
     "Action": [
             "ec2:CreateVolume",
             "ec2:DeleteVolume",
             "ec2:CreateTags",
             "ec2:DeleteTags"
             ],
     "Resource": "arn:aws:ec2:<AWS Region>:<AWS Account ID>:volume/*"
     },
  {
     "Effect": "Allow",
     "Action": [
             "iam:CreateServiceLinkedRole",
             "iam:PutRolePolicy"
             ],
     "Resource": [
              "arn:aws:iam::*:role/aws-service-role/spot.amazonaws.com/AWSServiceRoleForEC2Spot",
              "arn:aws:iam::*:role/aws-service-role/spotfleet.amazonaws.com/AWSServiceRoleForEC2SpotFleet"
              ],
     "Condition": {
          "StringLike": {
                 "iam:AWSServiceName": [
                        "spot.amazonaws.com",
                        "spotfleet.amazonaws.com"
                        ]
                 }
          }
     },
  {
     "Effect": "Allow",
     "Action": [
             "ec2:CreateNetworkInterface",
             "ec2:DetachNetworkInterface",
             "ec2:DescribeNetworkInterfaces",
             "ec2:DescribeNetworkInterfaceAttribute",
             "ec2:ModifyNetworkInterfaceAttribute",
             "ec2:DeleteNetworkInterface",
             "ec2:AttachNetworkInterface"
             ],
     "Resource": "*"
     },
  {
      "Effect": "Allow",
      "Action": [
             "iam:PassRole",
             "iam:GetRole"
             ],
      "Resource": "arn:aws:iam::<AWS Account ID>:role/qubole-ec2-spot-fleet-role"
      }
   ]
 }
Note
Mention the corresponding AWS region that is represented by <aws-region> in the above sample.
If you are creating a new policy with the above permissions, then attach this newly created policy to the AWS user (with IAM Role configured in Qubole) accessing Qubole. Alternatively, just add these permissions to an existing policy that is attached to the AWS user (with IAM Role configured in Qubole) accessing Qubole.
For more information, see Configuring Qubole Account Settings for AWS and Managing Access for AWS.
Navigate to the AWS UI to create a new AWS Service Role.
To create, in the AWS UI, choose the AWS service trusted entity and choose EC2 as the service.
Click Attach Permissions Policies and select AmazonEC2SpotFleetTaggingRole from the list and click Next to proceed.
After completing the steps, name the role as
qubole-ec2-spot-fleet-role. In case, if the role exists, then ensure that AmazonEC2SpotFleetTaggingRole is attached to it. Otherwise, attach the policy as described in Step 5.Caution
Ensure to name the role as
qubole-ec2-spot-fleet-rolefor QDS to recognize it. Even a small change in this role name results in an error.In the UI, go to Trust relationships and choose Edit trust relationship. On the Edit Trust Relationship page, in the policy, add
spotfleet.amazonaws.comas the trusted entity forqubole-ec2-spot-fleet-role.
Qubole provides API and UI support to configure this feature. For more information on the API configuration option,
heterogeneous_instance_config, see Create a New Cluster or Clone a Cluster or Edit a Cluster Configuration.
For more information on the UI configuration option, see Configuring Heterogeneous Worker Nodes in the QDS UI.
In a heterogeneous cluster configuration, the task and container configurations are decided by the smallest instance type provided in the configuration. This is true even if the cluster is actually homogeneous and does not include nodes of other instance types. The precedence of instance types is decided based on their memory-to-CPU ratio. Thus, an m4.xlarge machine is larger than an m4.large machine. Between different instances from different families, the precedence is decided on the basis of on the list below (from largest to smallest):
x1ex1p2m2r5,r5a,r5d, andz1di3enandr5ng3p3d2,g3s,i2,i3,r3, andr4h1g4dnandm5am4,m5,m5d,m5nm3andm1c5nc5andc5dcc2g2c3andc4c1
Configuring Heterogeneous Worker Nodes in the QDS UI
Managing Clusters describes how to edit the cluster configuration through the QDS UI.
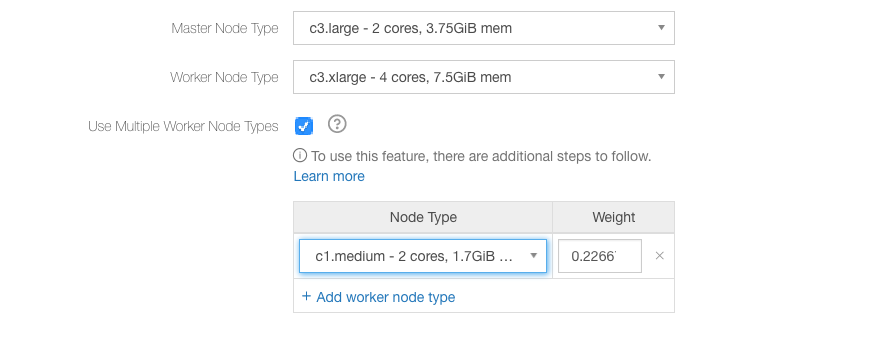
For a Hadoop 2, Presto, or Spark cluster, an option allows you to choose heterogeneous worker node types as shown in the following figure (an AWS example):

Select Use Multiple Worker Node Types to configure heterogeneous worker nodes. The UI displays worker node type and weight.
Note
There is another enhancement on how the UI displays the node weight, which is described in `Heterogeneous Weight Suggestion`__.

In the above figure, c3.xlarge is the first worker instance type and its weight is 1.0. For Azure this might be Standard_A6, or for OCI it might be BMDenseIO1.36.
Select the worker node type; its weight’s predetermined value is populated.
The default node weight is calculated as (memory of the node type / memory of the primary worker type).
Note
You must carefully pick instance types that have similar CPU and memory capacity. Choosing instances types with significantly different CPU and memory capacity may lead to degraded performance and increased query failures as the weakest configuration instance would be the bottleneck during query execution.
In case of Presto clusters, Qubole recommends you to first pick an instance family type (r/m/c) and
then choose instance types of the same size, which are not more than one generation apart. For example,
(r3.2xlarge, r4.2xlarge), (r4.4xlarge, r5.4xlarge, r5a.4xlarge), (c4.8xlarge, c5.8xlarge)
and so on.
You can edit the worker node’s weight. Override the default weight if you want to base it on the number of CPUs, cost, or any other parameter.
The order of preference among worker nodes is set to the order in which worker node types are selected.
For AWS, it is valid only for On-Demand nodes. However, with Spot instances, QDS uses AWS spot fleet, so QDS will obtain the cheapest combination of nodes of different types that satisfies the target capacity.
Click Add worker node type to add another worker node type. You can select a maximum of 10 worker node types.
For examples, see Using Heterogeneous Nodes in Hadoop 2/Presto/Spark Clusters.
Note
In a heterogeneous cluster, upscaling can cause the actual number of nodes running in the cluster to exceed the configured Maximum Worker Nodes. See Why is my cluster scaling beyond the configured maximum number of nodes?.
Heterogeneous Weight Suggestion
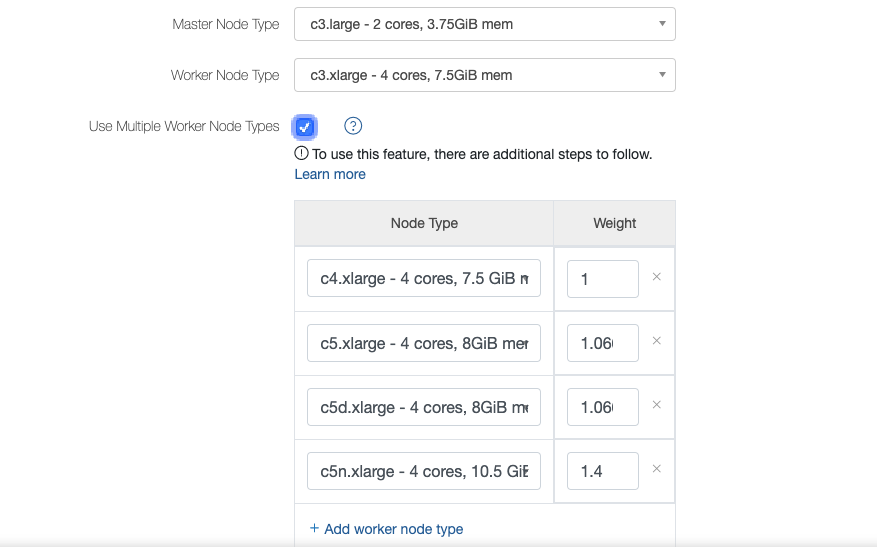
When you try enabling heterogeneous configuration in the Clusters UI page, the UI suggests instances similar to the chosen worker node type but from different generations instead of suggesting the instance of the double weight of the same generation (earlier) as shown in this figure.

This enhancement is part of Gradual Rollout.