Using Qubole Hive Connector - for Tableau 2019.4 or later
Follow the instructions below to connect to QDS using the Custom Qubole Hive Connector (JDBC):
A. Download and Install Qubole Hive Connector and Qubole JDBC Driver
Follow the instructions from Tableau Gallery.
B. Connect to Qubole Data Service (QDS):
Follow the instructions below to connect to QDS:
After opening Tableau, navigate to the Connect menu. Under To a Server, select More….
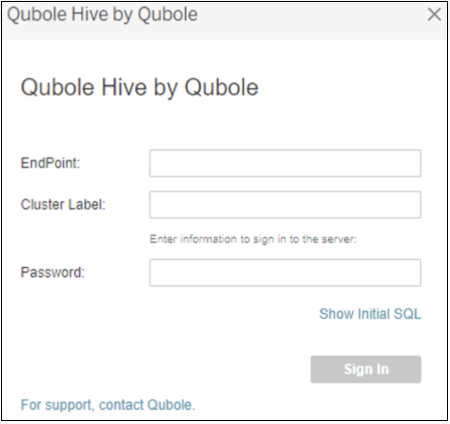
Click Qubole Hive by Qubole and the Qubole Hive by Qubole dialog box appears.

Enter the EndPoint, Cluster Label, and Password in their respective fields.
Note
Password/API Token: You can find the Auth Token or Password from QDS (Control Panel > My Accounts > click Show under the API Token column and copy it). To know more, see Managing Your Accounts.
EndPoint: Mention the EndPoint based on the region where you have the Qubole account. For more information, see Supported Qubole Endpoints on Different Cloud Providers. The EndPoint doesn’t require suffixes such as
/api/xxx. For example, the EndPoint can behttps://in.qubole.com.How to add additional parameters? You should add the additional JDBC parameter with the EndPoint field value and use a semicolon (;) to separate them (Example:
https://api.qubole.com;qds_bypass=true;LogLevel=6;LogPath=/tmp).
Click Sign In to connect to QDS.
You have successfully connected to Qubole Data Service (QDS) via Qubole Hive Connector (JDBC).