Connecting to Redshift Data Source from Spark
Spark on Qubole supports the Spark Redshift connector, which is a library that lets you load data from Amazon Redshift tables into Spark SQL DataFrames, and write data back to Redshift tables. Amazon S3 is used to efficiently transfer data in and out of Redshift, and a Redshift JDBC is used to automatically trigger the appropriate COPY and UNLOAD commands on Redshift. As a result, it requires AWS credentials with read and write access to a S3 bucket (specified using the tempdir configuration parameter). This is supported on Scala and Python.
The Spark Redshift connector is supported on Spark 2.4 and later versions, and the supported AWS Redshift JDBC jar version is com.amazon.redshift.jdbc42-1.2.36.1060.
Note
This feature is not enabled for all users by default. Create a ticket with Qubole Support to enable this feature on the QDS account.
Usage
You can use the Spark Redshift connector to load data from and write back data to Redshift tables in the following ways:
Creating a Redshift Data Store and using the
Catalog Namefor the configuration.Adding the Redshift configuration details inline.
You can use the Data Sources API in Scala, Python, R or SQL languages.
Creating a Redshift Data Store
Navigate to the Explore UI.
Click on the drop-down list near the top left of the page (it defaults to Qubole Hive) and choose +Add Data Store.
Select Redshift from the Database Type drop-down list.
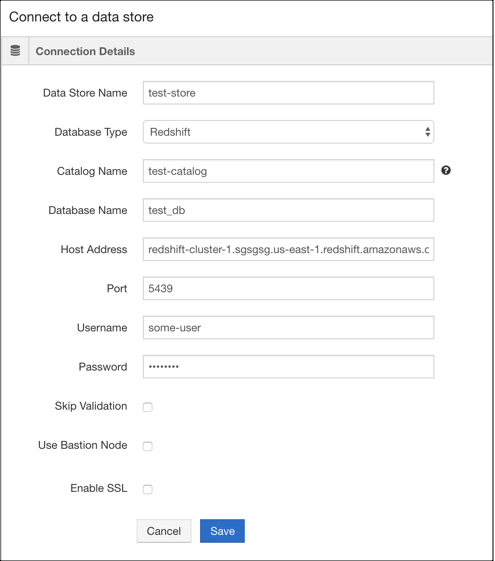
Enter the appropriate values in the following fields:
Data Store Name
Catalog Name
Database Name
Host Address
Port
Username and Password.
Click Save.
After the data store is created, restart the cluster for the changes to take effect.
The following figure shows Connect to a data store page with sample values for adding a Redshift data store.

The following example shows how to connect and read data from the Redshift Data store.
val catalogName = "test-catalog"
val  tempS3Dir = "s3://path/for/temp/data"
val sQuery = """SELECT * from event"""
val df = spark.read.option("forward_spark_s3_credentials", "true").option("query", sQuery).redshift(catalogName, tempS3Dir)
df.show
Examples with Redshift Configuration Details Inline
The following example notebooks show how to use the Spark Redshift connector with configuration details inline.
// Spark Redshift connector Example Notebook - Scala

val jdbcURL = "jdbc:redshift://redshifthost:5439/database?user=username&password=pass"
val tempS3Dir = "s3://path/for/temp/data"

// Read Redshift table using dataframe apis
val df: DataFrame = spark.read
    .format("com.qubole.spark.redshift")
    .option("url", jdbcURL)
    .option("dbtable", "tbl")
    .option("tempdir", tempS3Dir)
    .load()

// Load Redshift query results in a Spark dataframe
val df: DataFrame = spark.read
    .format("com.qubole.spark.redshift")
    .option("url", jdbcURL)
    .option("query", "select col1, col2 from tbl group by col3")
    .option("forward_spark_s3_credentials", "true")
    .option("tempdir",tempS3Dir)
    .load()

// Write data to Redshift

// Create a new Redshift table with the given dataframe
// df = <dataframe that is to be written to Redshift>
df.write
  .format("com.qubole.spark.redshift")
  .option("url",jdbcURL)
  .option("dbtable", "tbl_write")
  .option("forward_spark_s3_credentials", "true")
  .option("tempdir", tempS3Dir)
  .mode("error")
  .save()

// To overwrite data in Redshift table
df.write
  .format("com.qubole.spark.redshift")
  .option("url",jdbcURL)
  .option("dbtable", "tbl_write")
  .option("forward_spark_s3_credentials", "true")
  .option("tempdir", tempS3Dir)
  .mode("overwrite")
  .save()

// Authentication
// Using IAM Role based authentication instead of keys
df.write
  .format("com.qubole.spark.redshift")
  .option("url",jdbcURL)
  .option("dbtable", "tbl")
  .option("aws_iam_role", <IAM_ROLE_ARN>)
  .option("tempdir", tempS3Dir)
  .mode("error")
  .save()
# Spark Redshift connector Example Notebook - PySpark

 jdbcURL = "jdbc:redshift://redshifthost:5439/database?user=username&password=pass"
 tempS3Dir = "s3://path/for/temp/data"

 # Read Redshift table using dataframe apis
 df = spark.read \
       .format("com.qubole.spark.redshift") \
       .option("url", jdbcURL) \
       .option("dbtable", "tbl") \
       .option("forward_spark_s3_credentials", "true")
       .option("tempdir", tempS3Dir) \
       .load()

 # Load Redshift query results in a Spark dataframe
 df = spark.read \
       .format("com.qubole.spark.redshift") \
       .option("url", jdbcURL) \
       .option("query", "select col1, col2 from tbl group by col3") \
       .option("forward_spark_s3_credentials", "true")
       .option("tempdir",tempS3Dir) \
       .load()


 # Create a new redshift table with the given dataframe data
 # df = <dataframe that is to be written to Redshift>
 df.write \
   .format("com.qubole.spark.redshift") \
   .option("url",jdbcURL) \
   .option("dbtable", "tbl_write") \
   .option("forward_spark_s3_credentials", "true")
   .option("tempdir", tempS3Dir) \
   .mode("error") \
   .save()

 // To overwrite data in Redshift table
 df.write \
   .format("com.qubole.spark.redshift") \
   .option("url",jdbcURL) \
   .option("dbtable", "tbl_write") \
   .option("forward_spark_s3_credentials", "true")
   .option("tempdir", tempS3Dir) \
   .mode("overwrite") \
   .save()

 # Using IAM Role based authentication instead of keys
 df.write \
   .format("com.qubole.spark.redshift") \
   .option("url",jdbcURL) \
   .option("dbtable", "tbl") \
   .option("aws_iam_role", <IAM_ROLE_ARN>) \
   .option("tempdir", tempS3Dir) \
   .mode("error") \
   .save()
# Spark Redshift connector Example Notebook - SparkR


 jdbcURL <- "jdbc:redshift://redshifthost:5439/database?user=username&password=pass"
 tempS3Dir <- "s3://path/for/temp/data"

 # Read Redshift table using dataframe apis
 df <- read.df(
    NULL,
    "com.qubole.spark.redshift",
    forward_spark_s3_credentials = "true",
    tempdir = tempS3Dir,
    dbtable = "tbl",
    url = jdbcURL,

 # Load Redshift query results in a Spark dataframe
 df <- read.df(
    NULL,
    "com.qubole.spark.redshift",
    forward_spark_s3_credentials = "true",
    tempdir = tempS3Dir,
    query = "select col1, col2 from tbl group by col3",
    url = jdbcURL,


 # Create a new redshift table with the given dataframe data
 # df = <dataframe that is to be written to Redshift>
 df <- write.df(df,
    NULL,
    "com.qubole.spark.redshift",
    forward_spark_s3_credentials = "true",
    tempdir = tempS3Dir,
    dbtable = "tbl_write",
    url = jdbcURL,

 # To overwrite data in Redshift table
 df <- write.df(df,
    NULL,
    "com.qubole.spark.redshift",
    forward_spark_s3_credentials = "true",
    tempdir = tempS3Dir,
    dbtable = "tbl_write",
    url = jdbcURL,
    mode = "overwrite",


 # Using IAM Role based authentication instead of keys
 df <- read.df(
    NULL,
    "com.qubole.spark.redshift",
    tempdir = tempS3Dir,
    dbtable = "tbl",
    url = jdbcURL,
    aws_iam_role = <IAM_ROLE_ARN>)
Note
The SQL API supports only creating of new tables. Overwriting or appending is not supported.
-- Spark Redshift connector Example Notebook - SQL

-- Read from Redshift

-- Read Redshift table using dataframe apis
CREATE TABLE tbl
USING com.qubole.spark.redshift
OPTIONS (
  dbtable 'tbl',
  forward_spark_s3_credentials 'true',
  tempdir 's3://path/for/temp/data',
  url 'jdbc:redshift://redshifthost:5439/database?user=username&password=pass',
)

-- Load Redshift query results in a Spark dataframe
CREATE TABLE tbl
USING com.qubole.spark.redshift
OPTIONS (
  query 'select x, count(*) from table_in_redshift group by x',
  forward_spark_s3_credentials 'true',
  tempdir 's3://path/for/temp/data',
  url 'jdbc:redshift://redshifthost:5439/database?user=username&password=pass',
)

-- Writing to Redshift

-- Create a new table in redshift, throws an error if a table with the same name already exists
CREATE TABLE tbl_write
USING com.qubole.spark.redshift
OPTIONS (
  dbtable 'tbl_write',
  forward_spark_s3_credentials 'true',
  tempdir 's3n://path/for/temp/data'
  url 'jdbc:redshift://redshifthost:5439/database?user=username&password=pass'
)
AS SELECT * FROM tabletosave;

-- Using IAM Role based authentication instead of keys
CREATE TABLE tbl
USING com.qubole.spark.redshift
OPTIONS (
  dbtable 'table_in_redshift',
  tempdir 's3://path/for/temp/data',
  url 'jdbc:redshift://redshifthost:5439/database?user=username&password=pass',
  aws_iam_role <IAM_ROLE_ARN>
)
For more information, see https://github.com/databricks/spark-redshift.