Configuring a Cluster in a VPC with Public and Private Subnets (AWS)
This topic explains how to configure a cluster in an AWS VPC with public and private subnets:
For instructions on configuring a private subnet for Azure or Oracle see Configuring a Private Subnet.
Configuring a cluster in a VPC with public and private subnets requires the following steps:
See the AWS documentation for more information.
About the Bastion Host
QDS uses the Bastion host for all communication to and from the cluster.
QDS supports only one Bastion node per Hive metastore.
This means that if you have multiple Qubole accounts and use Qubole-managed Hive metastores, you must not use the same Bastion node across the Qubole accounts. Using the same Bastion node may cause cluster startup failures and query failures. Even if you use a custom Hive metastore and multiple Qubole accounts use it, Qubole strongly recommends you use a separate Bastion node for each account, so as to ensure high availability and avoid creating a single point of failure.
Qubole recommends one of these two instance types for the Bastion host:
c5n.xlarge- 25 Gbps peak network throughput and 10.5 GB memorym5.xlarge/m5a.xlarge- 10 Gbps peak network throughput and 16 GB memory
Do not use
t2instance types for a Bastion host.Qubole recommends you attach an Elastic IP to the Bastion host. This prevents the public DNS hostname from changing if the Bastion host goes down or requires a restart. If the Bastion’s public DNS hostname changes, you must manually edit all the QDS clusters that use it to reflect the change, and in the meantime you may see connectivity issues between the Qubole Control Plane and clusters that are already running.
Selecting a Qubole-provided AMI for the Bastion Host
Use the image in the Amazon community labeled qubole-bastion-hvm-amzn-linux (a hardware virtual machine (HVM) image)
available in all AWS regions. If you find multiple images labeled qubole-bastion-hvm-amzn-linux, pick
the latest image.
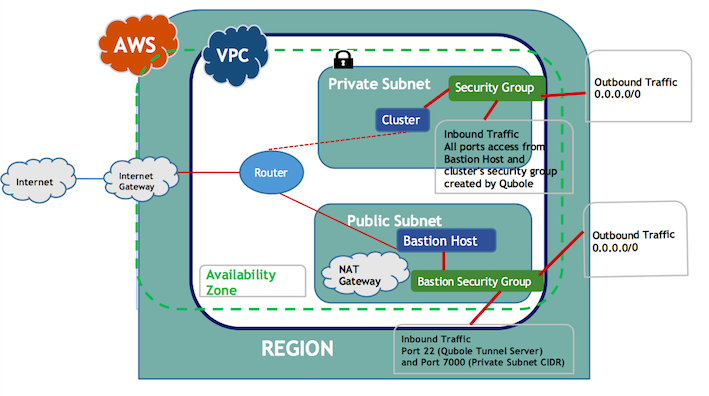
Creating a VPC with Private and Public Subnets
For the VPC, set the
EnableDNSHostnamesproperty totrue.Create the required private and public subnets for the VPC, and create a NAT gateway in the public subnet for the private subnet.
See Working with VPCs and Subnets for more information.
Note
Tunneling with Bastion Nodes for Private Subnets in an AWS VPC provides a list of IP addresses to allow for https://api.qubole.com and https://us.qubole.com QDS environments.
Configuring the Route Tables
Configure the route tables for the private and public subnets.
Private subnet:
All outbound traffic (0.0.0.0/0) must go to the NAT gateway or the NAT instance that resides in the public subnet. Qubole recommends using a NAT gateway instead of a custom NAT instance for high reliability. You should ensure that the Route Table contains an Amazon S3 endpoint as one of the routes.
If you do not find an Amazon S3 endpoint, create a VPC endpoint to allow direct access to the AWS S3 object store in the region the VPC is in and add this VPC endpoint as an entry in the private subnet’s route table.
Some AWS regions do not support NAT gateways. If the VPC is in one of these regions, create a NAT instance as described in NAT Instances. Configure the following inbound and outbound rules on the NAT instance.
Inbound
Open HTTP and HTTPS ports for private subnet CIDR.
Outbound
Allow outgoing traffic on all ports to everywhere.
Public subnet:
All outbound traffic (0.0.0.0/0) must go to the internet gateway. Make sure that the route table contains an Amazon S3 endpoint as one of the routes.
If you do not find an Amazon S3 endpoint, add the same VPC endpoint you created for the private subnet in the route table of the public subnet.
Creating a Security Group in the VPC
Create a security group for the Bastion host in the VPC where you want to launch the cluster, and configure the following inbound and outbound settings:
Inbound
See Tunneling with Bastion Nodes for Private Subnets in an AWS VPC for the Qubole tunnel server’s IP address. Allow SSH access (on port 22) to the Qubole tunnel server. Contact Qubole Support to open the SSH port of the Bastion node to a limited number IP addresses.
Note
Qubole strongly recommends you use a tunnel and do not open the Bastion node’s SSH access to the world.
For more information on the ports that allow inbound traffic, see Understanding Cluster Network Security Characteristics (AWS).
Allow port 7000 access to the private subnet CIDR.
Outbound
Allow outbound traffic on all ports to everywhere. Allowing outbound traffic to only a private subnet CIDR will also work.
For the Bastion host’s security group:
Allow VPC CIDR IP on ports 0-65535
Allow any additional user’s RDS on specified ports
Note
For more restrictive outbound settings, see Creating a Security Group in the VPC.
Configuring a Unique SSH Key for Your Account
Note
This is a mandatory step. For more information, see Supported Qubole Endpoints on Different Cloud Providers.
You need to configure
an account-level unique public-private SSH key pair; QDS uses the private key
to create an SSH tunnel to your Bastion node. Place the public key on the Bastion node under the home directory of the
SSH user (ec2-user by default), in ~/.ssh/authorized_keys.
View the Account-level Public SSH Key describes the API for viewing the account-level public SSH key.
Refresh the Account-level SSH Key Pair describes the API for refreshing or rotating the SSH key pair. You must add this public SSH key to the Bastion host by appending
~/.ssh/authorized_keysfor anec2-user. Whenever you rotate the public SSH key, make sure you replace the existing public SSH key with the rotated public SSH key on the Bastion host.Configuring a Custom SSH Key for the Bastion Node explains why you need a separate key-pair to log in to the Bastion node, and points you to the relevant instructions.
Configuring a Custom SSH Key for the Bastion Node
Because the private key from the pair you have configured for QDS is not available to you as the Bastion user, you need to configure a separate SSH key-pair to log in to the Bastion node. Follow these AWS instructions. You will use this key-pair when you start the Bastion node.
Bringing Up the Bastion Host
Make you have completed all the tasks described so far on this page:
Created or selected a VPC and public subnet – Creating a VPC with Private and Public Subnets
Configured routing tables – Configuring the Route Tables
Configured a security group – Creating a Security Group in the VPC
Configured a unique SSH key for your QDS account – Configuring a Unique SSH Key for Your Account
Configured a custom SSH key – Configuring a Custom SSH Key for the Bastion Node
Once you have done all of the above, bring up the Bastion node on an AWS EC2 instance in the public subnet of the VPC. Use your custom SSH key to start the Bastion node.
Special Instructions for Bastion Hosts using non-Qubole AMIs
If you are not using Qubole’s AMI to bring up the Bastion node, do the following:
Modify the SSH configuration in
/etc/ssh/sshd_configto add these two configurations:Set
GatewayPortsandAllowTcpForwardingtoyes.Set
MaxSessions 1024andMaxStartups 1024to allow more than the default 10 parallel SSH sessions/connections.
After editing the SSH configuration file, run
sudo /etc/init.d/sshd restartto restart the SSH service.In case of an AL2 AMI, run
sudo systemctl restart sshto restart the SSH service.
Creating a Cluster in the VPC
Create a cluster in the VPC you have created:
Create the cluster with the VPC’s vpc-id and a private subnet ID within the VPC.
See Advanced configuration: Modifying EC2 Settings (AWS) for more information. Once tunnelling is enabled on the cluster, it is automatically
used for cluster orchestration, health checks, log imports, running commands, and so on.