Configuring Qubole to Interact with Talend
You must create a Qubole account, and configure the Spark and Hadoop clusters that will be used with the Talend Studio.
Creating a Qubole Account
If you are a new user or want to use a new account then create a new Qubole account.
For Azure: Connect qubole to your Azure accunt
You can create a QDS Business Edition account, which allows you to consume up to 10,000 Qubole Compute Usage Hours (QCUH) per month at no cost. However, you are responsible for the cost of AWS and Azure resources that Qubole manages on your behalf.
At any time you can upgrade your account to QDS Enterprise Edition and use Qubole Cloud Agents, which provide actionable Alerts, Insights, and Recommendations (AIR) to optimize reliability, performance, and costs. To upgrade your account to QDS Enterprise Edition, see the Enterprise Edition upgrade webpage
Configuring Clusters for Talend
Before you begin, you must have the IP address of the Talend job server.
Log in to QDS.
From the Home menu, click Clusters to navigate to the Clusters page.
Depending on the jobs that you want to run, select and start the appropriate cluster:
If you want to run…
Then…
Hive, MapReduce, and HDFS jobs
Spark or Spark streaming jobs
Select a Hadoop2 Cluster
From the Clusters page, click on the required Hadoop cluster.
Click Edit on the top right corner.
Enter a file name in the Node Bootstrap file. For example,
my_bootstrap.shClick Update only.
Hover on … against the Hadoop cluster and select Edit Node Bootstrap.
Copy and paste the following source code in the Node Bootstrap to enable Java 8 for the Hadoop cluster.
#!/bin/bash

HUSTLER_HOME=/usr/lib/hustler
source ${HUSTLER_HOME}/bin/qubole-bash-lib.sh

export JAVA_HOME=/usr/lib/jvm/java-1.8.0_60
export PATH=$JAVA_HOME/bin:$PATH
sudo echo "export JAVA_HOME=/usr/lib/jvm/java-1.8.0_60" >> /etc/profile
sudo echo "export PATH=$JAVA_HOME/bin:$PATH" >> /etc/profile

sed -i 's/java-1.7.0/java-1.8.0_60/' /etc/hadoop/hadoop-env.sh
sed -i 's/java-1.7.0/java-1.8.0_60/' /etc/hadoop/mapred-env.sh
sed -i 's/java-1.7.0/java-1.8.0_60/' /etc/hadoop/yarn-env.sh

sudo echo "export JAVA_HOME=/usr/lib/jvm/java-1.8.0_60" >> /usr/lib/zeppelin/conf/zeppelin-env.sh

is_master=`nodeinfo is_master`
if [[ "$is_master" == "1" ]]; then

# Daemons on master

sudo runuser -l yarn -c '/usr/lib/hadoop2/sbin/yarn-daemon.sh stop resourcemanager' # as yarn user
sudo runuser -l yarn -c '/usr/lib/hadoop2/sbin/yarn-daemon.sh start resourcemanager' # as yarn user

sudo runuser -l hdfs -c '/usr/lib/hadoop2/sbin/hadoop-daemon.sh stop namenode' # as hdfs user
sudo runuser -l hdfs -c '/usr/lib/hadoop2/sbin/hadoop-daemon.sh start namenode' # as hdfs user

#uncomment this if Spark
sudo /usr/lib/zeppelin/bin/zeppelin-daemon.sh stop # as root user
sudo /usr/lib/zeppelin/bin/zeppelin-daemon.sh start # as root user

sudo runuser -l yarn -c '/usr/lib/spark/sbin/stop-history-server.sh' # as yarn user
sudo runuser -l yarn -c '/usr/lib/spark/sbin/start-history-server.sh' # as yarn user

sudo runuser -l mapred -c '/usr/lib/hadoop2/sbin/mr-jobhistory-daemon.sh stop historyserver' # as mapred user
sudo runuser -l mapred -c '/usr/lib/hadoop2/sbin/mr-jobhistory-daemon.sh start historyserver' # as mapred user

sudo runuser -l yarn -c '/usr/lib/hadoop2/sbin/yarn-daemon.sh stop timelineserver' # as yarn user
sudo runuser -l yarn -c '/usr/lib/hadoop2/sbin/yarn-daemon.sh start timelineserver' # as yarn user

sudo /usr/lib/hive2/bin/thrift-metastore server stop # as root user
sudo /usr/lib/hive2/bin/thrift-metastore server start # as root user

else

# Daemons on workers
sudo runuser -l yarn -c '/usr/lib/hadoop2/sbin/yarn-daemon.sh stop nodemanager' # as yarn user
sudo runuser -l yarn -c '/usr/lib/hadoop2/sbin/yarn-daemon.sh start nodemanager' # as yarn user

sudo runuser -l hdfs -c '/usr/lib/hadoop2/sbin/hadoop-daemon.sh stop datanode' # as hdfs user
sudo runuser -l hdfs -c '/usr/lib/hadoop2/sbin/hadoop-daemon.sh start datanode' # as hdfs user

fi
Click Edit on the top right corner and navigate to Advanced Configuration.
In the HIVE SETTINGS section, select the Enable Hive Server 2 check box.
Select a Spark Cluster
From the Clusters page, click on the required Spark cluster.
Click Edit on the top right corner.
From the Spark Version drop-down list, select 2.0 latest (2.0.2).
Enter a file name in the Node Bootstrap file. For example,
my_bootstrap.shClick Update only.
Hover on … against the Spark cluster and select Edit Node Bootstrap.
Copy and paste the following source code in the Node Bootstrap to enable Java 8 for the Spark cluster.
#!/bin/bash

source /usr/lib/hustler/bin/qubole-bash-lib.sh
export PROFILE_FILE=${PROFILE_FILE:-/etc/profile}
export HADOOP_ETC_DIR=${HADOOP_ETC_DIR:-/usr/lib/hadoop2/etc/hadoop}

function restart_master_services() {

  monit unmonitor namenode
  monit unmonitor timelineserver
  monit unmonitor historyserver
  monit unmonitor resourcemanager

  /bin/su -s /bin/bash -c '/usr/lib/hadoop2/sbin/yarn-daemon.sh stop timelineserver' yarn
  /bin/su -s /bin/bash -c 'HADOOP_LIBEXEC_DIR=/usr/lib/hadoop2/libexec /usr/lib/hadoop2/sbin/mr-jobhistory-daemon.sh stop historyserver' mapred
  /bin/su -s /bin/bash -c '/usr/lib/hadoop2/sbin/yarn-daemon.sh stop resourcemanager' yarn
  /bin/su -s /bin/bash -c '/usr/lib/hadoop2/sbin/hadoop-daemon.sh stop namenode' hdfs

  /bin/su -s /bin/bash -c '/usr/lib/hadoop2/sbin/hadoop-daemon.sh start namenode' hdfs
  /bin/su -s /bin/bash -c '/usr/lib/hadoop2/sbin/yarn-daemon.sh start resourcemanager' yarn
  /bin/su -s /bin/bash -c 'HADOOP_LIBEXEC_DIR=/usr/lib/hadoop2/libexec /usr/lib/hadoop2/sbin/mr-jobhistory-daemon.sh start historyserver' mapred
  /bin/su -s /bin/bash -c '/usr/lib/hadoop2/sbin/yarn-daemon.sh start timelineserver' yarn

  sudo /usr/lib/zeppelin/bin/zeppelin-daemon.sh stop # as root user
  sudo /usr/lib/zeppelin/bin/zeppelin-daemon.sh start # as root user

  monit monitor namenode
  monit monitor resourcemanager
  monit monitor historyserver
  monit monitor timelineserver
  }

 function restart_worker_services() {
  monit unmonitor datanode
  /bin/su -s /bin/bash -c '/usr/lib/hadoop2/sbin/hadoop-daemon.sh stop datanode' hdfs
  /bin/su -s /bin/bash -c '/usr/lib/hadoop2/sbin/hadoop-daemon.sh start datanode' hdfs
  monit monitor datanode
  # No need to restart nodemanager since it starts only
  # after thhe bootstrap is finished
  }

 function use_java8() {
 export JAVA_HOME=/usr/lib/jvm/java-1.8.0
 export PATH=$JAVA_HOME/bin:$PATH
 echo "export JAVA_HOME=/usr/lib/jvm/java-1.8.0" >> "$PROFILE_FILE"
 echo "export PATH=$JAVA_HOME/bin:$PATH" >> "$PROFILE_FILE"
 sudo echo "export JAVA_HOME=/usr/lib/jvm/java-1.8.0_60" >>  /usr/lib/zeppelin/conf/zeppelin-env.sh
 sed -i 's/java-1.7.0/java-1.8.0/' "$HADOOP_ETC_DIR/hadoop-env.sh"
 rm -rf /usr/bin/java
 ln -s $JAVA_HOME/bin/java /usr/bin/java

 is_master=$(nodeinfo is_master)
 if [[ "$is_master" == "1" ]]; then
   restart_master_services
 else
   restart_worker_services
 fi
 }

use_java8
If your Qubole account uses an IAM role for the AWS account, perform the following steps:
Ensure that the EIP permissions are set appropriately. For more information, see Sample Policy for Elastic IP Address
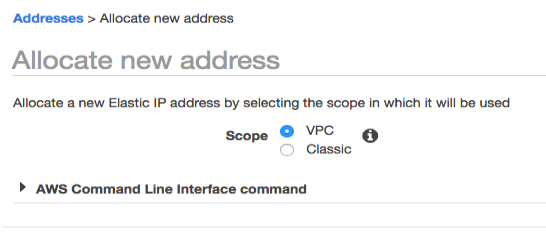
Create an Elastic IP in the AWS portal under Network & Security with VPC scope. The following figure shows the Allocate new address section in AWS.

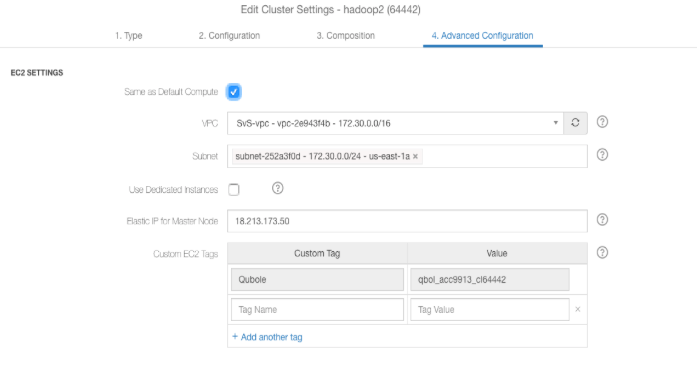
Enter the newly created IP in the Advanced Configuration of the cluster.
Select the required cluster and click Edit next to the cluster. Navigate to Advanced Configuration and enter the Elastic IP that you created on the AWS portal as shown in the following figure.

Note the public DNS of the coordinator node of the Hadoop2 or Spark cluster that you configured.
Create a security group in AWS console by using the IP address of the Talend job server:
Log in to the AWS EC2 console and navigate to the Security Groups page.
Click Create Security Group to create a new security group.
Enter the name and description for the security group.
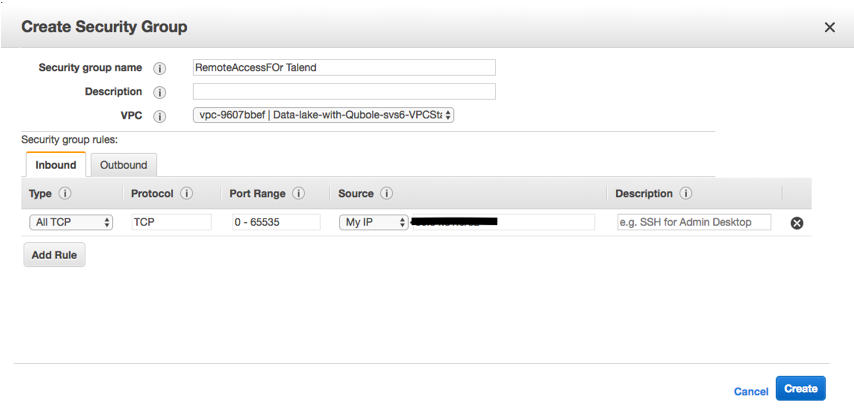
Click on the Inbound tab. Click Add Rule, and select All TCP in the Type column.
In the Source column, add the IP address of the Talend job server and click Create.
The following illustration shows the Create Security Group page with sample values.

Verify that the newly added rule is displayed in the Inbound tab.
Note the name of the security group.
From QDS, setup the cluster to use the persistence security group, which enables communication between the Talend Job Server Qubole cluster:
Navigate to the Clusters page.
Click Edit on the required cluster and navigate to Advanced Configuration.
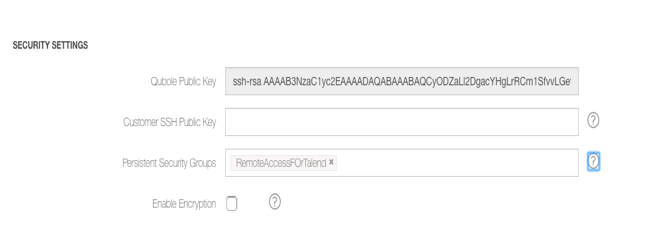
Go to the SECURITY SETTINGS page, add the name of the security group in the Persistent Security Groups field as shown in the figure.

Click Update only to save the changes.
For Azure environment, perform the following steps:
Create a Network Security Group with Inbound security rules using the source IP of the Talend Job Server.
Edit the cluster settings on QDS UI to add the Network Security Group name.
Select the required cluster and click Edit next to the cluster. Navigate to Advanced Configuration and select the newly created network security group from the Network Security Group drop-down list.
Start the cluster for the changes to take effect.