Building Streaming Pipelines using Custom Jars or Code
You can build streaming pipelines by using your own custom Jar files or code (BYOC/J) from the Pipelines UI.
You can also run your streaming pipelines by using the Pipelines APIs. For more information, see Introduction to Qubole Pipelines Service APIs (Pipelines APIs).
Note
You must ensure that the Pipelines resource is allowed for your role to create a streaming pipeline. Additionally, you must have the access to run Spark commands to run the streaming pipelines.
Steps
Navigate to the Pipelines page.
Click +Create new.
Click Build using JAR or custom Code.
Enter a name for the pipeline. The pipeline name must be unique. The name you entered helps you discover the pipeline in the State-of-the-Union view.
From the Set Properties section, perform the following actions:
Select a suitable Spark streaming cluster from the Select cluster drop-down list.
If there are no Spark streaming clusters available, create a new Spark streaming cluster by clicking on the Create Streaming cluster hyperlink. The Create New Cluster page opens in a separate tab.
Select Spark Streaming and click Next or Create.
In the Configuration tab, enter a cluster label in the Cluster Labels field.
Verify the default values. Modify them if required, click Next.
Enter the values in the relevant fields in the Composition tab, and click Next.
In the Advanced Configuration tab, ensure the following options are enabled:
Enable Prometheus
Disable Timeout for Long Running Task
Enable Log Rolling
Click Create.
Navigate back to the Pipelines UI.
Refresh the page to ensure that the newly created Spark streaming cluster is visible in the drop-down list.
The following animated GIF shows how to create a Spark Streaming cluster and how to add properties.

If you want to enable retries on failure of pipelines, select the Yes option.
When this option is enabled, the pipeline is run with auto retries with exponential backoff if it fails due to intermittent errors.
Add the required spark override configurations in the Other spark configurations field. If you have any UDFs or dependent JARs, or tune other parameters, add the required configuration.
Click Next: Custom Code or JAR.
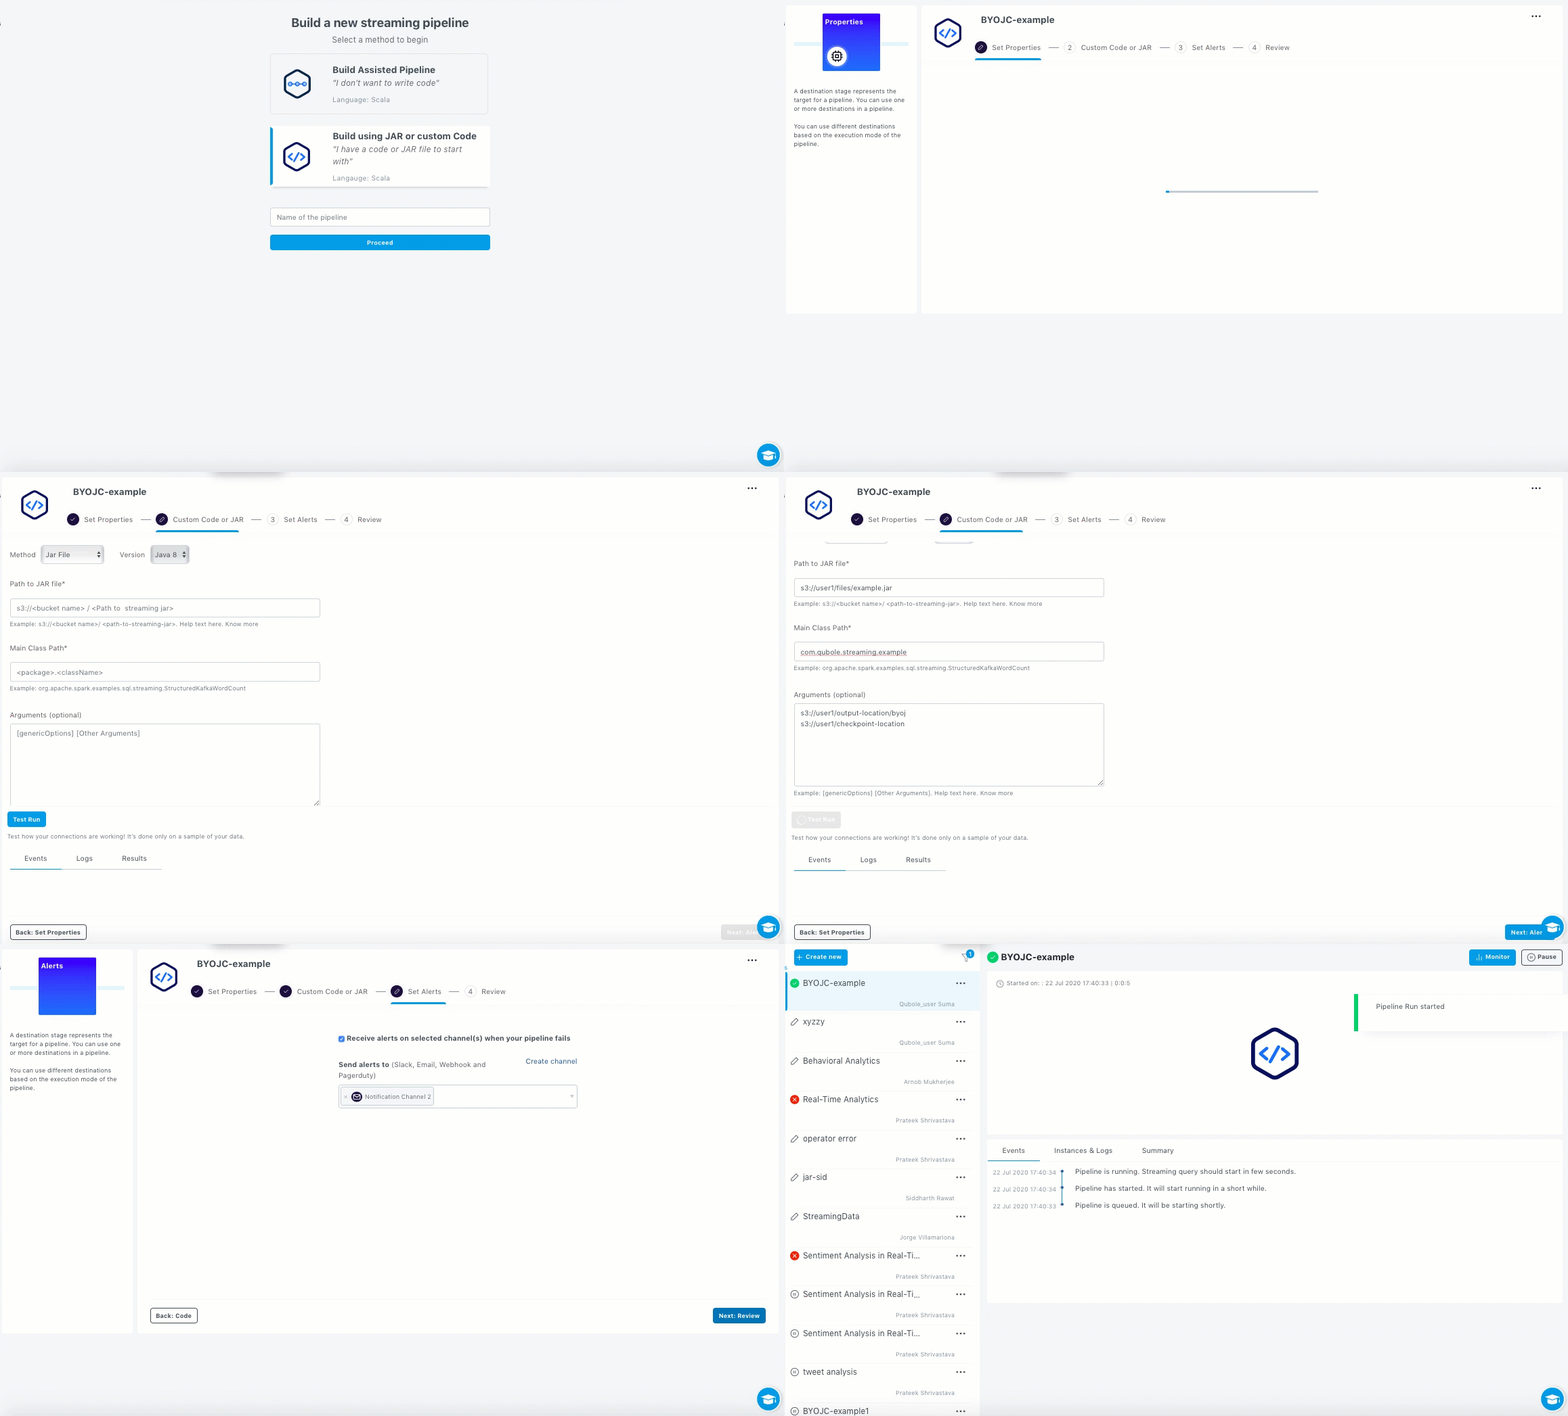
From the Custom Code or JAR section, depending on the method you want to use, perform the appropriate actions:
If you want to use JAR file, enter the following information in the respective fields:
Path to the JAR file.
Fully resolved name of the main class.
Any command line arguments for your program (optional).
If you want to use Custom Code, enter the following information in the respective fields:
Select the required language from the drop-down list.
Enter the code.
Any command line arguments for your program (optional).
Click Test Run.
The TEST RUN operation reads limited records (10 records) from source, applies the logic, and writes the output to console in the Results tab. It also maintains separate temporary checkpoint location to prevent any corruption to your runtime production checkpoint. As the output is written only to the console, the production sink is clean and healthy. Test runs time out after a specified number of triggers.
The events, logs, and results are displayed in the respective tabs.
You can view the command logs of the test run in the Events tab. Details such as started, queued, running, cancelled or stopped are displayed. Additionally, an event is also displayed when the connection to Kafka source is not established.
You can check the logs to debug and identify any errors or warnings.
Click Next: Alerts.
From the Set Alerts section, perform the following steps:
Ensure that the Receive alerts on selected channel(s) when your pipeline fails option is selected.
Select the required channels from the drop-down list.
If you want to create a new channel, click Create channel. Control Panel with Notification Channels is displayed in a new tab. See Creating Notification Channels.
Click Next: Review.
Review the pipeline along with the summary and configuration details of the pipeline. Click Deploy Now.
You pipeline now runs and the Pipelines home page with the State-of-the-Union view displayed.
The following animated GIF shows how to set custom code or jar, set alerts and run the pipeline using your own JAR files.

After building and running your pipelines, you can manage and monitor the pipelines.