Creating a Schema from Data in Cloud Storage
This section explains how to use Create Schema to create a Hive table in an existing folder or partition from the sample data in Cloud storage.
Note
You can pin/unpin the custom Cloud path by clicking the pin icon next to the Cloud location.
Follow these steps:
In the QDS user interface, navigate to Explore. In Explore, select My Amazon S3 or My Blob from the drop-down list. See Exploring Data in the Cloud for more information.
Select the file from which you want to create a table schema. By default, the Properties tab is displayed.
Click the Sample Data tab. Select the Format and Delimiter from the drop-down lists. Select Skip Header Row and Use As Column Names to set the first row as the column names. It is useful if the parent table contains the first row as the header row and the new table contains the system-defined column names, such as Col 1 and Col 2. Click the Create Schema button, or click the icon to get a drop-down list.
Select Create Table Schema To Hive.
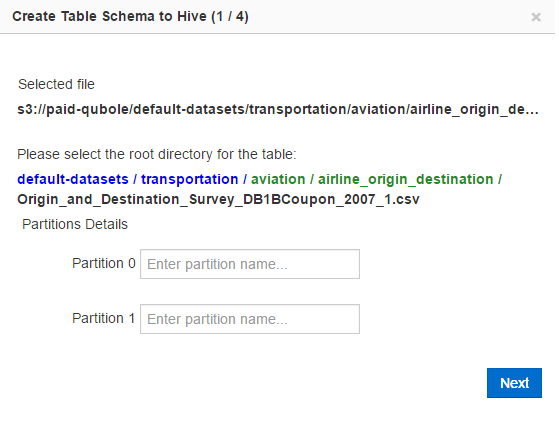
The Create Table Schema to Hive (1/4) dialog is displayed. Select the root file directory for the table. Type the partition name in the corresponding text field.
The following figure provides an example of selecting a root directory and naming partitions. For Azure Blob, the corresponding URI would be
wasb://default-datasets@paidqubole.blob.core.windows.net/.
Click Next to continue.
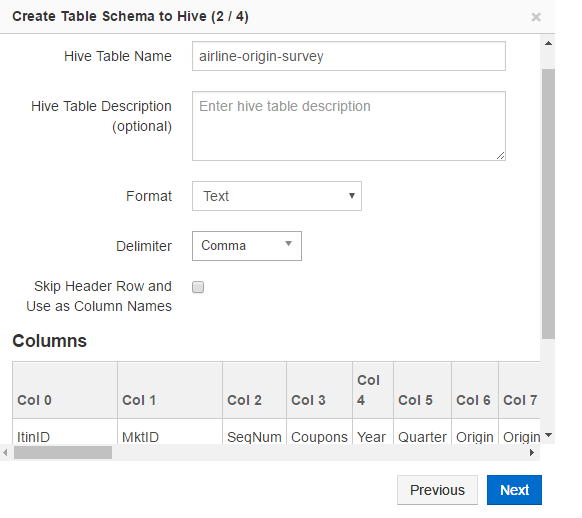
In the Create Table Schema to Hive (2/4) dialog, type a name in the Hive Table Name text field. You can change the Format and Delimiter.
A sample dialog is as shown in the following figure.

You can add a description in the Hive Table Description text box.
You can also select Skip Header Row and Use As Column Names to set the first row as the column names. It is useful if the parent table contained first row as the header row and the new table contains the system-defined column names such as Col 1 and Col 2.
Click Next to continue. Click Previous to go back to the previous step.
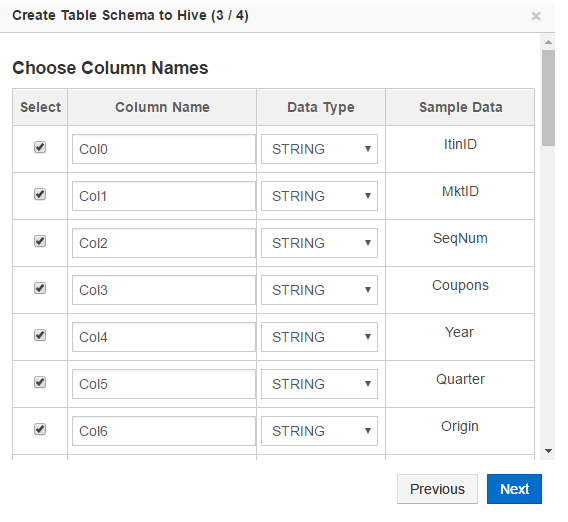
Clicking Next displays the Create Table Schema to Hive (3/4) dialog. It is used to select the columns that will be part of the Hive table selected in the previous step. All column names are selected by default. Columns that are not required can be unchecked. Column names can be changed only if they have system-defined names such as Col 1 and Col 2. You cannot edit column names if you have skipped the header row of the parent table and used these as column names. A sample dialog is as shown in the following figure.

Click Next to continue. Click Previous to go back to the previous step.
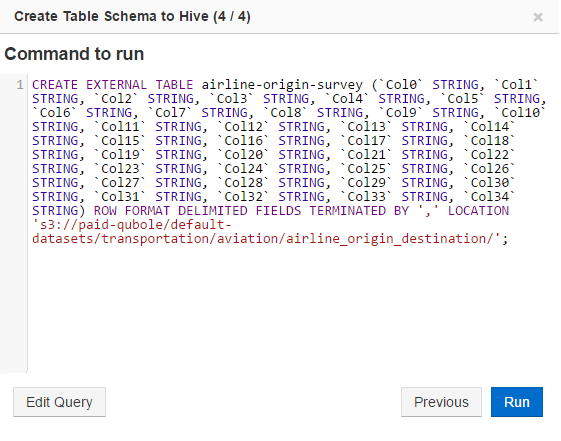
Clicking Next displays the Create Table Schema to Hive (4/4) dialog. This dialog displays the query to create the Hive table as illustrated in the following example. For Azure Blob, the corresponding URI would be
wasb://default-datasets@paidqubole.blob.core.windows.net/.
Click Previous to go back to the previous step.
Click Edit Query to open the query composer of the Analyze page and edit the query.
Once you are satisfied with the query, click Run to execute it.