GitLab Version Control for Jupyter Notebooks
To use the version control for Notebooks using GitLab, you must perform the following tasks:
After configuring the GitLab Repository, you can perform the following tasks to manage the notebook versions:
Configuring a GitLab Token
You can configure a GitLab Token for Jupyter notebooks at per user and per account setting level from the My Accounts or JupyterLab interface.
To configure the GitLab token for Jupyter notebooks for your account, see Configuring a GitLab Token.
To configure the GitLab token from Jupyter notebooks, perform the following steps:
Navigate to Notebooks >> Jupyter and open a Jupyter notebook.
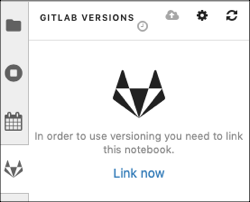
From the left sidebar, click on the GitLab Versions icon as shown in the following figure.

Click Configure now.
In the dialog box add the generated GitLab token and click Save.
The GitLab token is now configured for your account.
Linking Jupyter Notebooks to GitLab
After configuring the GitLab token, you can link Jupyter notebooks to GitLab.
Navigate to the GitLab profile and copy the URL from the browser’s address-bar.
Note
If you want to add
HTTPS *.gitlink as the GitLab repository URL, click Clone or Download. A drop-down text box is displayed. Copy the HTTPS URL or click Use HTTP (if it exists) to copy the HTTP URL.Navigate to Notebooks >> Jupyter and open a Jupyter notebook.
From the left sidebar, click on the GitLab Versions icon as shown in the following figure.
Click the Link Now option.
In the Link Notebook to GitLab dialog box, perform the following actions:
Add the GitLab repository URL in the Repository Web URL text field. Ensure that the GitLab profile token has read permissions for the repository to checkout a commit and write permissions for the repository to push a commit.
Select a branch from the Branch drop-down list.
Add an object path file in the Object Path text field.
If you want to strip the outputs from the notebooks before committing to GitLab, select the Strip Output checkbox.
A sample is as shown in the following figure.
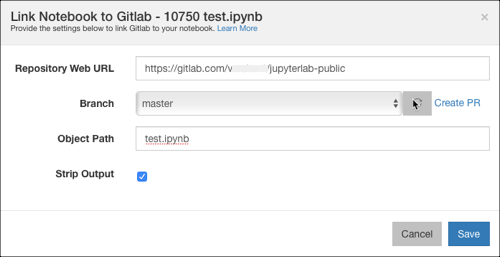
Click Save.
Pushing Commits to Linked GitLab
After you link notebooks with GitLab, you can start using the Jupyter notebook to push commits to the GitLab directly from a Jupyter notebook.
Steps
Open the required Jupyter notebook and save the changes.
From the left sidebar, click on the GitLab Versions icon.
Click the cloud icon to push the commit. A dialog opens to push commits. The following figure shows the version details and the Push to GitLab dialog.
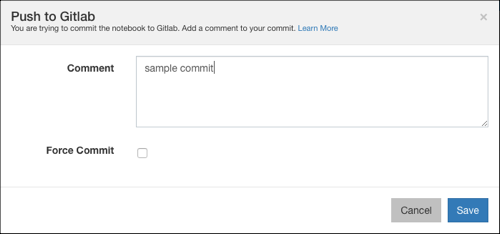
Add a commit message and click Save to push the commit to the GitLab repository. You can use the option force commit to force push over the old commit (irrespective of any conflict).
Note
Qubole does not store commits or revisions of notebooks. However, commits or revisions of notebooks can be fetched from users’ GitLab account whenever required.
Viewing and Comparing the Jupyter Notebook Versions
You can view a particular version of the Jupyter notebook by using the View option in the GITLAB VERSIONS sidebar as shown below.
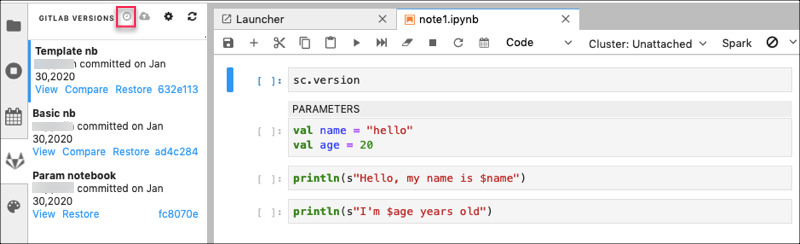
You can compare a version of the Jupyter notebook with the previous version or version with current changes by using the Compare option in the GITLAB VERSIONS sidebar as shown below.
The Compare icon on top of the left sidebar compares the current notebook with the head of the branch. The Compare hyperlink in the left sidebar compares the given version with the previous version.
The following image shows a sample comparison of Jupyter notebook versions.

Restoring a Commit from GitLab
Open the required Jupyter notebook.
From the left sidebar, click on the GitLab Versions icon.
Select a version from the list and click Restore to checkout that version.
Click OK to checkout that version in the confirmation dialog box.
Note
Qubole does not store commits or revisions of notebooks. However, commits or revisions of notebooks can be fetched from users’ GitLab account whenever required.
Creating a Pull Request from Jupyter Notebooks
Open the required Jupyter notebook.
From the left side bar, click on the GitLab Versions icon.
Click on the Gear icon in the GITLAB VERSIONS pane. The Link Notebook to GitLab dialog is displayed.
Click on the Create PR hyperlink.
Proceed with the steps in GitLab to create the PR.
For more information, see GitLab Documentation.
Resolving Conflicts While Using GitLab
There may be conflicts while pushing/checking out commits in the GitLab versions.
Note
You can use the option force commit to force push over the old commit (irrespective of any conflict).
Perform the following steps to resolve conflicts in commits:
Clone the notebook.
Link the cloned notebook to the same GitLab repo branch and path as the original notebook.
Checkout the latest version of the cloned notebook.
Manually port changes from the original notebook to the cloned notebook.
You can commit the cloned notebook after porting changes.