Custom Qubole Presto Connector (JDBC) - For Tableau Version 2019.1, 2019.2 and, 2019.3
Follow the instructions below to connect to QDS using the Custom Qubole Presto Connector (JDBC):
A. Download Qubole JDBC Driver
Download the latest Qubole JDBC driver (version 2.3 or later). For more information, see JDBC Driver.
Move the driver (jar) file to following location:
For Windows:
C:\Program Files\Tableau\DriversFor MAC:
~/Library/Tableau/DriversFor Linux:
/opt/tableau/tableau_driver/jdbc
B. Download Custom Qubole Presto Connector (JDBC):
Click here to download the Custom Qubole Presto Connector (JDBC).
C. Plugin the Custom Qubole Presto Connector (JDBC):
Follow the instructions below to plugin the Custom Qubole Presto Connector (JDBC):
After downloading the Custom Qubole Presto Connector (JDBC), run the following command to extract plugin
Qubole-Tableau-Jdbc-Plugin.zip:$ unzip Qubole-Tableau-Jdbc-Plugin.zip
Create a directory for Tableau connectors in the following location:
For Tableau Desktop:
MacOS:
/connectorWindows:
C:\connectorFor Tableau Server:
Linux:
/connectorWindows:
C:\connectorNote
The location of the connector must be in the root directory. For macOS Catalina version 10.15 or later, you are unable to write to root directory (
https://support.apple.com/en-in/HT210650). Therefore, you could create aconnectorin any of the directories while using macOS Catalina version 10.15 or later and ensure that the user has sufficient access to read and execute files in that respective directory.Copy the
qubole_jdbcdirectory containing your connector’smanifest.xmlfile in the newly created directory.Run Tableau using
-DConnectPluginsPathcommand line argument for Tableau Desktop pointing to your connector directory, as mentioned below:For MAC:
/Applications/Tableau\ Desktop\ 2019.1.app/Contents/MacOS/Tableau -DConnectPluginsPath=/connector/
For Windows:
cd c:\Program Files\Tableau\Tableau 2019.1\bin
tableau.exe -DConnectPluginsPath=C:\connector
For Tableau Server: Run the Tableau Server Manager (TSM) with the following option to make it available for publishing:
For Linux/Windows:
tsm configuration set -k native_api.connect_plugins_path -v <path_to_connector> --force-keys
tsm pending-changes  apply

This operation will perform a server restart. Are you sure you wish to continue?
(y/n): y
Starting deployments asynchronous job.
You have successfully plugged in the connector.
Note
If you mention an incorrect <path-to-directory> which doesn’t have plugin code, you will view the following errors:
For Tableau Desktop: Custom Qubole Presto Connector with the name “Qubole Presto” will not appear in the list of connectors when you start Tableau.
For Tableau Server: Once you publish a report from Tableau Desktop, prompt appears with an error: “Tableau doesn’t recognize the data source type qubole_jdbc”.
D. Connect to Qubole Data Service (QDS):
Follow the instructions below to connect to QDS:
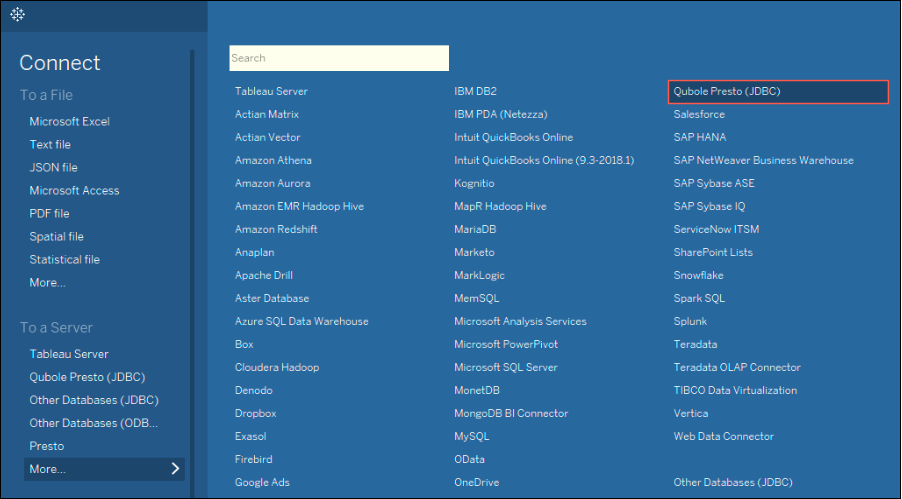
After opening Tableau, navigate to the Connect menu. Under To a Server, select More….
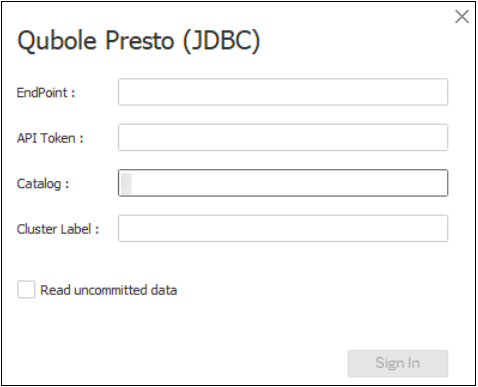
Click Qubole Presto (JDBC) and the Qubole Presto (JDBC) dialog box appears.
Enter the EndPoint, API Token, Catalog, and Cluster Label in their respective fields.
Note
API Token: You can find the Auth Token or Password from QDS (Control Panel > My Accounts > click Show under the API Token column and copy it). To know more, see Managing Your Accounts. If you want to add additional JDBC parameters in the EndPoint field, use semicolon (;) to separate them (Example: https://api.qubole.com;LogLevel=6;LogPath=/tmp).
EndPoint: Mention the EndPoint based on the region where you have the Qubole account. For more information, see Supported Qubole Endpoints on Different Cloud Providers. The EndPoint doesn’t require suffixes such as
/api/xxx. For example, the EndPoint can behttps://in.qubole.com.
Select Read uncommitted data check box to enable streaming results.
Click Sign In to fire a query on the Qubole portal.
You have successfully connected to Qubole Data Service (QDS) via Qubole Presto Connector (JDBC).
Note
Remove all the
.tdcfiles (if there is any) fromDocuments/My\ Tableau\ Repository/Datasources.You should take the following precautions with Custom Qubole Presto Connector (JDBC):
Open Other Sessions of Tableau from the terminal to use Custom Qubole Presto Connector (JDBC).
If you open new workbooks from the Tableau UI, the subsequent sessions don’t display the Custom Qubole Presto Connector (JDBC). To avoid this, you should launch new sessions through command-line parameters as instructed above.