Managing Jupyter Notebooks
After creating a Jupyter notebook, you can perform various tasks to manage Jupyter notebooks from the JupyterLab interface.
Note
You can view and edit Jupyter notebooks even when the cluster is offline. This feature is available in the latest version of Jupyter Notebooks. Contact Qubole Support to migrate to the latest version of Jupyter Notebooks.
Setting Access Control for Jupyter Notebooks
You can specify the access control for your Jupyter notebooks.
Note
This feature is available in the latest version of Jupyter Notebooks. Contact Qubole Support to migrate to the latest version of Jupyter Notebooks.
Select and right-click on the required Jupyter notebook.
From the context menu, select Manage Permissions. The Manage Permissions dialog is displayed as shown below.
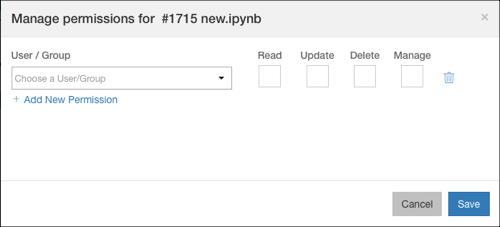
Select the users or groups, and select the appropriate permissions.
Click Save.
Viewing Jupyter Notebooks
You can open and view multiple Jupyter notebooks. Each Jupyter notebook opens as a separate tab in the Main Work Area.
You can drag and reposition the notebooks anywhere in the Main Work Area.
To view a single document in the Main Work Area, navigate to View and select Single-Document Mode.
You can also create a new view for the output for a cell as a separate tab by right-clicking on the cell and selecting Create New View for Output. You can drag and reposition the Output View window in the Main Work Area.
Renaming Jupyter Notebooks
You can rename the Jupyter notebooks either from the Jupyter notebook tab in the Main Work Area or from the File Browser.
Perform one of the following steps to rename a Jupyter notebook:
Rename from the Main Work Area.
In the center panel, right-click on the title of the notebook and select Rename Notebook.
From the Rename File pop-up window, enter a new name and click Rename.
The following animated GIF shows how to rename a Jupyter notebook from the Main Work Area.
Rename from the File Browser.
From the File Browser pane on the left panel, right-click on the required notebook, select Rename.
Enter a new name.
The following animated GIF shows how to rename a Jupyter notebook from the File Browser pane.
Copying Example Notebooks
You can copy the example notebooks and paste it in your working directory.
Click on the Example Notebooks icon on the left tool bar.
In the left sidebar, select and right click on the required example notebook, and click Copy.
Navigate to your working directory and open the required folder.
Right-click in the left sidebar, click Paste.
Moving Jupyter Notebooks to a Folder
When you create a Jupyter notebook, it is created in your current working folder. You can move the Jupyter notebook from one folder to the other by dragging from the source folder and dropping to the destination folder.
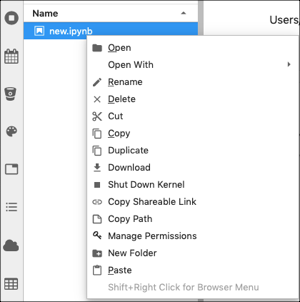
Other Options
The context menu of a Jupyter notebook in the left panel provides various options that you can use for a notebook.
Depending on the action you want to perform, select the appropriate option from the menu as shown below.
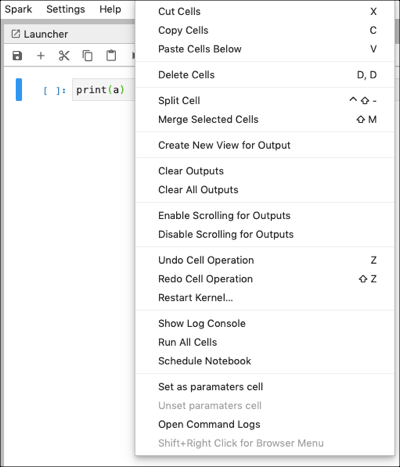
Cell Operations
You can perform various cell-level operations by using the options displayed in the context menu of a cell.
Right-click on the required cell.
Depending on the action you want to perform, select the appropriate option from the menu as shown below.
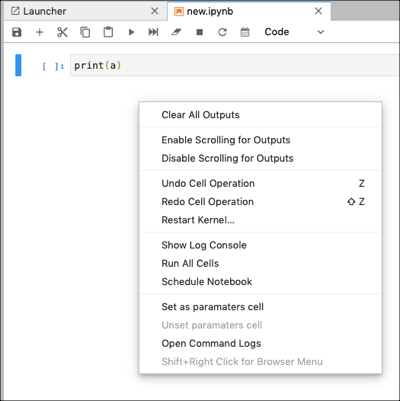
You can perform various cell-level operations for the entire notebook by using the options displayed in the context menu of the main work area.
Right-click anywhere on the main work area.
Depending on the action you want to perform, select the appropriate option from the menu as shown below.
Using Shortcuts
You can use certain shortcuts to perform a few operations:
Press Tab in the cells to view and use autocomplete suggestions for Spark and PySpark notebooks.
Press Shift+Tab to view docstring help in PySpark notebooks