Managing Notebooks
You can create, edit, or delete a notebook. The following topics explain how to manage notebooks:
Note
A pin is available at the bottom-left of the Notebooks UI. You can use it to hide/unhide the left side bar to toggle the notebooks’ list.
Viewing a Notebook Information
Click the notebook in the left panel to view its details. The notebook’s ID, its type, associated cluster are displayed. You can resize the left panel/sidebar.
The following figure shows an illustration of a notebook’s details displayed.
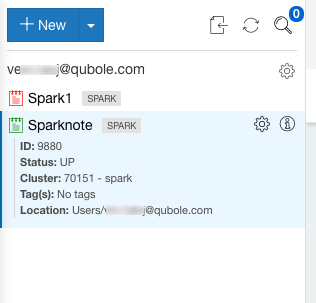
A notebook that is marked green indicates that its assigned cluster running in the left panel. Click it in the left panel and the notebook is displayed in the right panel as shown in the following figure.
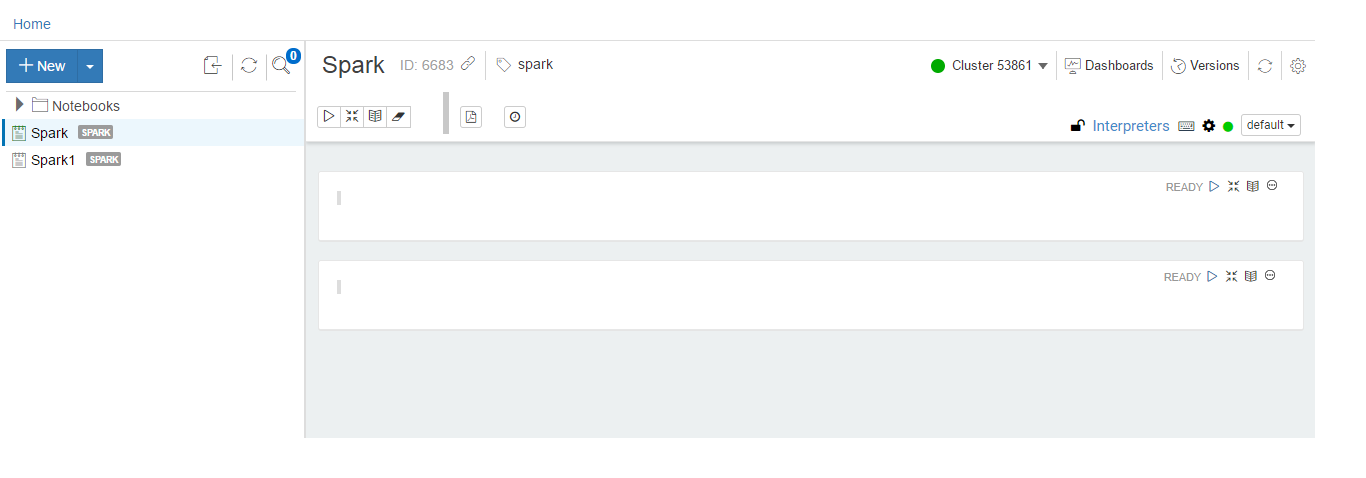
The notebook shows a green circle against Connected status and Interpreters. It also shows the associated cluster status (running) with its ID along with the notebook’s ID on the top-left corner of the notebook.
The following figure provides the different icon options available in a notebook.
A notebook that is marked red indicates that its assigned cluster in a down state. Such notebooks are read-only and cannot be used to run a paragraph. You can edit the name of a read-only notebook. You can also start the assigned cluster within the notebook. The following figure shows an example of a read-only notebook whose assigned cluster is not running.

Click Start Now to start the assigned cluster. After the assigned cluster is in a running state, use this notebook to run paragraphs.
A notebook that is marked grey indicates that it does not have any assigned cluster. Click it to see more details. To assign a cluster to a notebook, just click the cluster drop-down that is available in the notebook. Alternatively, you can configure the settings as described in Configuring a Notebook.
An unassigned notebook example is shown in the following figure.

Click Refresh List for refreshing notebooks’ list.
Click the Notebook button to see all notebooks in the account.
Note
If there is a firewall blocking outgoing data packets from a notebook, then allow the outgoing data traffic on the port 443. In general, allow port 80 and port 443 for a secure HTTPS-to-HTTPS communication.
Viewing Cluster Status
You can view the cluster status by using the cluster widget on the Notebooks page that displays the real-time information about the cluster health.
Note
This feature is not enabled for all users by default. Create a ticket with Qubole Support to enable this feature on the QDS account.
On the Notebooks page, click on the Cluster widget. Status of the cluster is displayed as shown in the following figure.
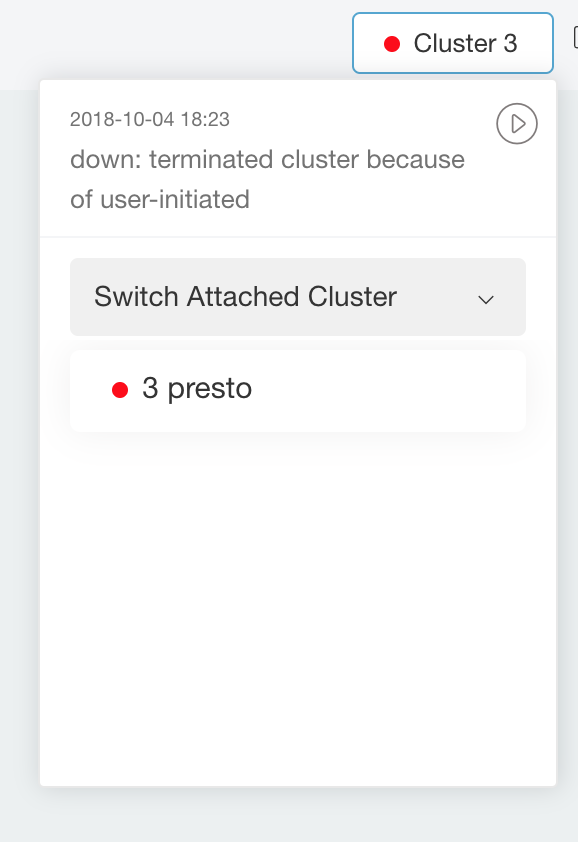
You can also switch the attached cluster by selecting another cluster from the Switch Attached Cluster drop-down list.
Viewing Spark Application Status
You can view the Spark application status by using the widget on the Notebooks page that tracks the status of the Spark application and displays real-time information about the application.
Note
This feature is not enabled for all users by default. Create a ticket with Qubole Support to enable this feature on the QDS account.
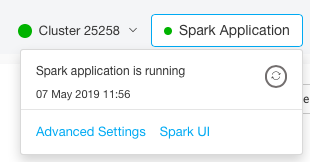
On the Notebooks page, click on the Spark Application widget. Status of the Spark application is displayed as shown in the following figure.
Using Folders in Notebooks
Qubole supports folders in notebooks as illustrated in the following figure.
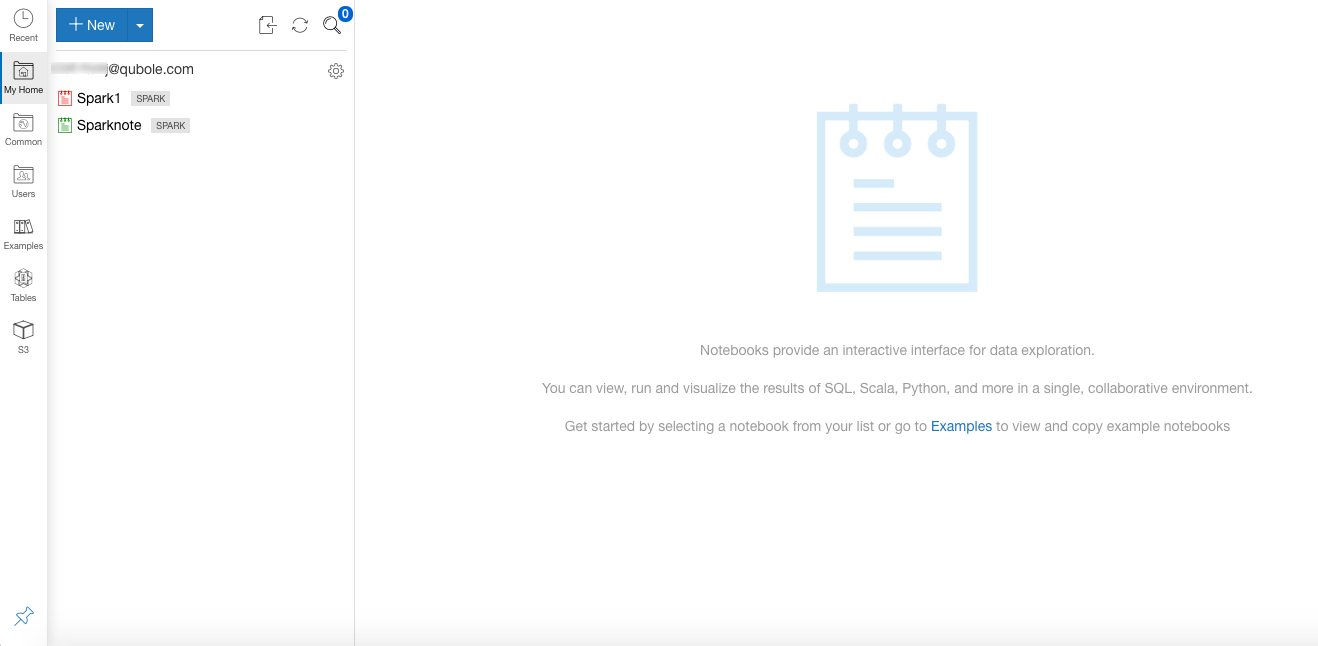
Currently folders are available only with notebooks. So, in a notebook, you can create folders and organize your notebooks in it. You can also drag a notebook from one folder and drop it to another folder to move it. The side panel that shows the notebook folders gets automatically hidden once you are in the active notebook.
All folders are created inside the default location (storage). The folders that are available in the Notebooks UI by default are:
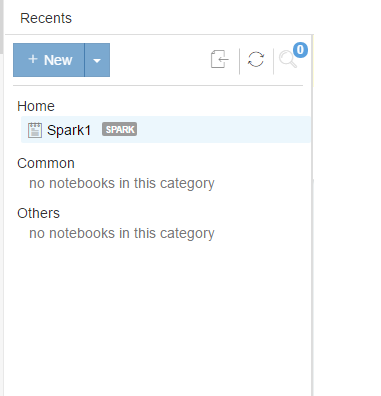
Recent - It contains the notebooks that have been created/used recently by the current user with a folder hierarchy as shown below.
My Home - It contains the notebooks of the current user. It is the home directory/location of a Qubole account’s user.
Common - It is a special folder, where you can create projects and collaborate with your team members and provide access to different users of a project. A system admin or a user with Folder write access can create projects inside the Common folder and provide access to a set of users. You require
adminpermission to enable changing-permissions of other users.If you are a system admin or Folder admin, you can grant access to other users in an organization.
Users - As Qubole is a shared system and there are multiple users within an account, Qubole has combined all folders of a single Qubole account’s users in this folder. With this, you can easily navigate through other user’s folders. By default, Qubole creates a Notebook folder for each user in user/<your email address>/. You can create multiple folders and sub-folders to organize notebooks. You need to go to a user’s folder to check out a peer’s notebooks. You can view someone else notebooks until that notebook’s owner has explicitly denied access to other users.
Examples - It contains a list of sample notebooks with paragraphs in supported languages as shown here.
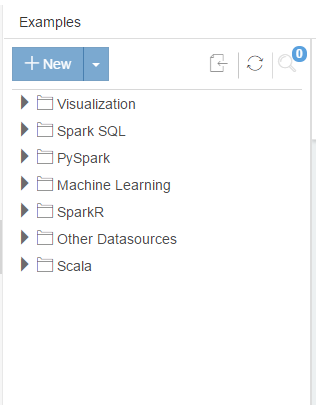
You can copy the sample notebooks.
Tables - It provides access to Hive tables. For more information, see Tables Tab.
S3 - It is the Amazon S3 location. For more information, see (Filesystem) Tab. You can upload and download files to and from any Amazon S3 bucket. See Uploading and Downloading a File to or from a Cloud Location for more information.
By default, users of a Qubole account have read access and a system admin and users with Folder write access have full access on all notebooks. You can change permission for users but you cannot revoke the access for the system admins.
Creating a Folder
You can create a folder in My Home, Common, or Users/other_user_email folders with the required permissions for Common and Users folders. In the left panel, pull the downward arrow that is next to the New button and click Folder from the drop-down list. The dialog to create a new folder is displayed as shown in the following example.
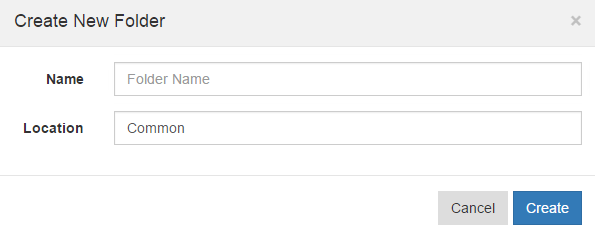
Add a name to the folder and the base folder location is by default added. Change it if you want a different location. You can select the location through the visual location picker provided by Qubole as shown here.
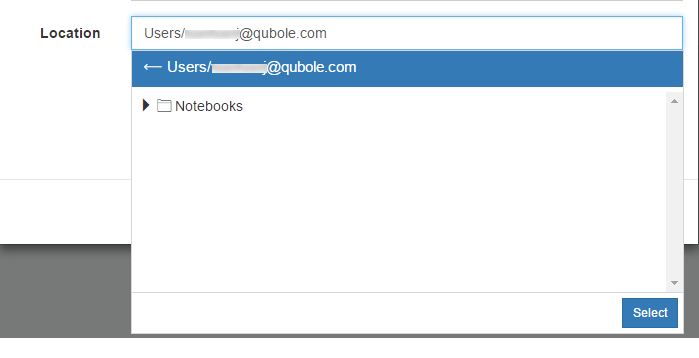
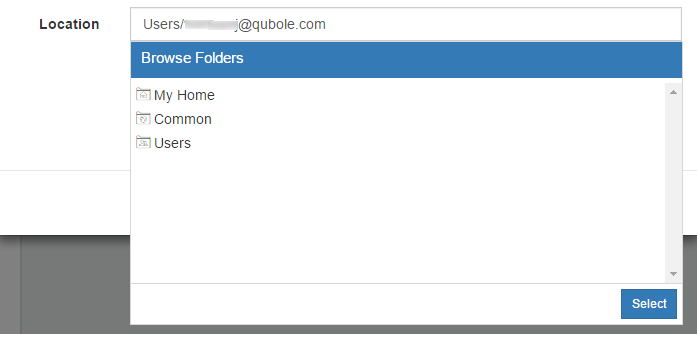
Clicking the leftward arrow displays the top-level folders as shown here.
Understanding Folder Operations
You can refresh, rename, move, copy, or delete a notebook folder as described in this list:
To refresh a folder, click the gear icon against the notebook folder that you want to refresh. Click Refresh from the drop-down list.
To rename a folder, click the gear icon against the notebook folder that you want to rename. Click Rename from the drop-down list. The dialog is displayed as shown in the following figure.
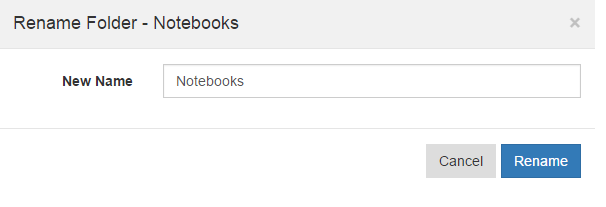
Add a new name to the folder and click Rename.
To move a folder, click the gear icon against the notebook folder that you want to move. Click Move from the drop-down list. The dialog is displayed as shown in the following figure.

Add a path to the folder in Destination or browse to the new location and click Move.
To delete a folder, click the gear icon against the notebook folder that you want to delete. Click Delete from the drop-down list.
A dialog is displayed that asks for confirmation for deleting the folder. Click OK to delete it.
Managing Folder-level Permissions
You can override the Folder access for folders that is granted at the account-level in the Control Panel. For more information, see Managing Roles.
If you are part of the system-admin group or any group which have manage access on the Folder resource,
then you can manage permissions.
Note
You can set/override folder-level permissions only to the first-level folder in each default-folder such as Common or Users.
To set the folder-level permission, perform the following steps:
Click the gear/settings icon against a folder, the Manage Permissions for <Foldername> dialog is displayed as shown in the following figure.
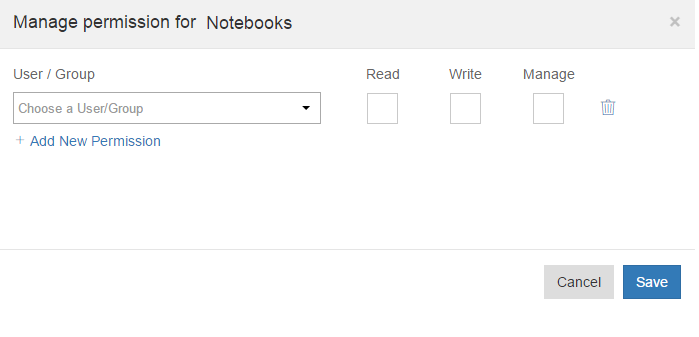
Select a user/group from the drop-down list.
You can set the following folder-level permissions for a user or a group:
Read: Set it if you want to change a a user/group’s read access to this specific folder.
Write: Set it if you want a user/group to have write privileges in this specific folder.
Manage: Set it if you want a user/group who can manage access to this specific folder. The subfolders have the same access.
You can add any number of permissions to the folder by clicking Add Permission.
You can click the delete icon against a permission to delete it.
Click Save for setting folder permissions to the user/group. Click Cancel to go back to the previous tab.
Managing Notebook Permissions
Here, you can set permission for a notebook. By default, all users in a Qubole account have read access on the notebook
but you can change the access. You can override the notebook access that is granted at the account-level in the
Control Panel. If you are part of the system-admin group or any group which have full access on the
Notes resource, then you can manage permissions. For more information, see Managing Roles.
A system-admin and the owner can manage the permissions of a notebook by default. Perform the following steps to manage a notebook’s permissions:
Click the gear box icon next to notebooks and click Manage Permission.
The dialog to manage permissions for a specific notebook is displayed as shown in the following figure.
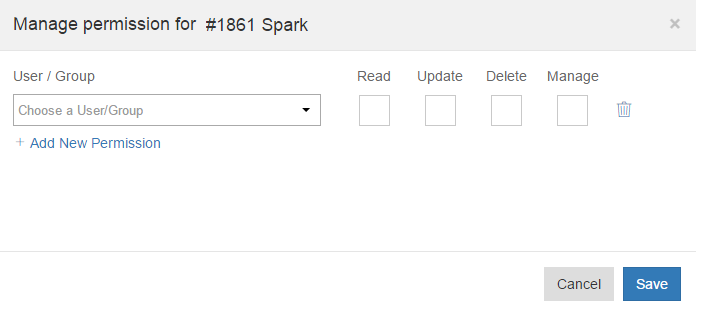
You can set the following notebook-level permissions for a user or a group:
Read: Set it if you want to change a user/group’s read access to this specific notebook.
Update: Set it if you want a user/group to have write privileges for this specific notebook.
Delete: Set it if you want a user/group who can delete this specific notebook.
Manage: Set it if you want a user/group to grant and manage access to other users/groups for accessing this specific notebook.
You can add any number of permissions to the notebook by clicking Add Permission.
You can click the delete icon against a permission to delete it.
Click Save for setting permissions to the user/group. Click Cancel to go back to the previous tab.
Locking a Notebook
You can lock and unlock notebooks. When you lock a notebook, you prevent edits and other actions such as running a paragraph, clear output and show/hide code on it, from other users in the account.
Once the notebook is ready to be used, you can unlock it to make it available to all users in the account. This is a useful safeguard in a multi-user Qubole account.
To lock a notebook, click the lock icon, ![]() .
.
When you lock a notebook, the icon turns locked as illustrated in the following figure.

By locking a notebook, you get exclusive control over it. Other users in the account can view the notebook but cannot edit or delete it until you unlock it. To unlock the notebook, click the lock icon again:

Creating a Notebook
You can create notebooks for Spark and Presto clusters. You can create a notebook of a particular cluster type (for example, Spark) only if your QDS account has at least one cluster of that type. You cannot modify the type of the notebook after it is assigned to a cluster.
Click the New button that is on the top of the left panel, and click Notebook from the drop-down list. The Create New Notebook dialog box is displayed as shown in the following figure.
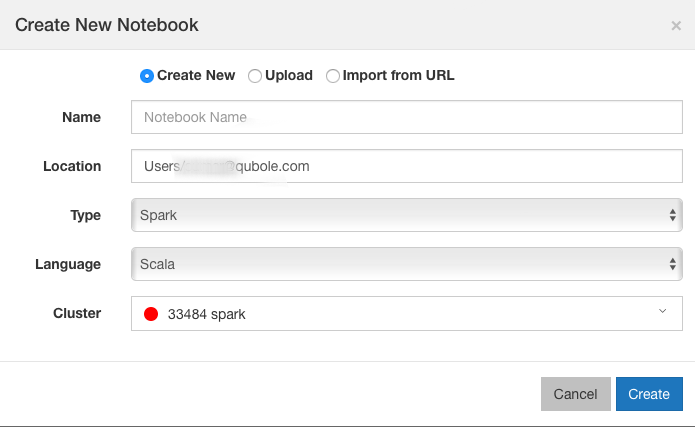
Add a name for the notebook.
Select the type from the drop-down list that shows Spark by default.
If you selected the type of notebook as Spark, then the Language field is displayed. Select the required language from the drop-down list. By default, Scala is selected.
For Spark notebooks, this field specifies the default supported language for the Spark Interpreter. The default language persists when the notebook is detached from one cluster and attached to another cluster, and when this notebook is imported or exported.
Note
The default language option for Spark notebooks is not available for all users by default. Create a ticket with Qubole Support to enable this feature on the QDS account.
Location shows the current user’s last-visited folder. Qubole provides a visual location picker to set the location. The two illustrations in Creating a Folder show the visual location picker with the default location and top-level folders.
Select a cluster from the Cluster drop-down list to which you want to assign the notebook.
Click Create to add the notebook.
A unique notebook ID is assigned to the newly created notebook.
Exporting a Notebook
You can export a notebook in the JSON format. To export an existing notebook, click the settings icon to see the list as shown in the following figure.
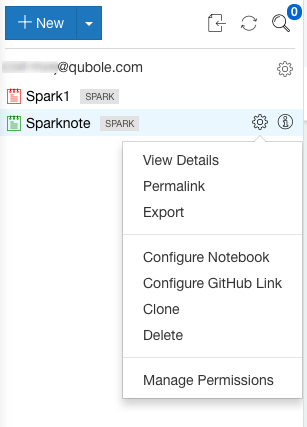
Click Export. A Save As dialog is displayed and save the notebook by browsing to the required folder/directory in the JSON format. By default, it saves as the notebook in the parent notebook’s name. You can change the name while saving the notebook.
You can also export a notebook by clicking the settings icon (gear icon) within a notebook and click Export from the drop-down list.
Note
You can export the notebook even when the cluster is down.
Downloading a Notebook
You can download a notebook in PDF, PNG, and HTML formats. When downloading the notebook, you can choose to show or hide the notebook code in the downloaded file.
Note
To download a notebook, you must have the create permission to the Commands resource as described in Resources, Actions, and What they Mean.
In the Notebooks page, click on the Settings icon.
Select Download As.
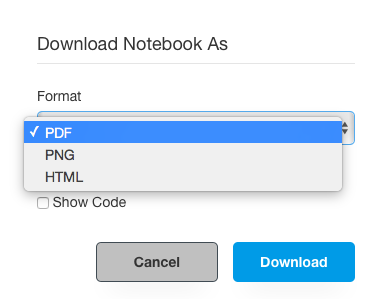
In the Download Notebook As dialog box, select the required format from the drop-down list. By default, PDF is selected.
If you want to see the notebook code in the downloaded format, then select Show Code check box. Click Download.
The following figure shows a sample Download Notebook As dialog box.
Note
If a notebook fails to render within 3 minutes, then the download option fails.
You can also download notebooks by using the command API. See Submit a Notebook Convert Command
Emailing a Notebook
You can email a notebook as an attachment in PDF, PNG, and HTML formats. When emailing the notebook, you can choose to show or hide the notebook code in the attachment.
Note
To email a notebook, you must have the create permission to the Commands resource as described in Resources, Actions, and What they Mean.
In the Notebooks page, click on the Settings icon.
Select Email as attachment.
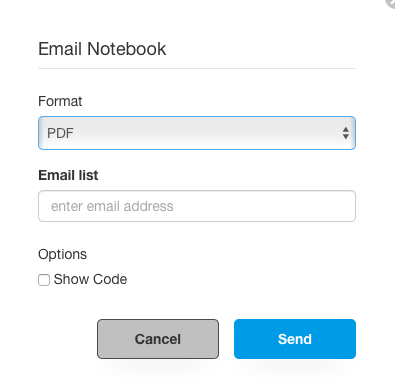
In the Email Notebook dialog box, select the required format from the drop-down list. By default, PDF is selected.
Enter the email address. If you want to send the attachment to multiple recipients, then add comma separated email addresses.
If you want to see the notebook code in the attachment, then select Show Code check box. Click Send.
The following figure shows a sample Email Notebook dialog box.
Note
If a notebook fails to render within 3 minutes, then the email option fails.
You can also email notebooks as attachments by using the command API. See Submit a Notebook Convert Command.
Uploading a Notebook
You can upload Zeppelin (JSON) or Jupyter (ipynb) notebooks to your Qubole account.
Click +New in the top of the left navigation pane. The Create New Notebook dialog box is displayed.
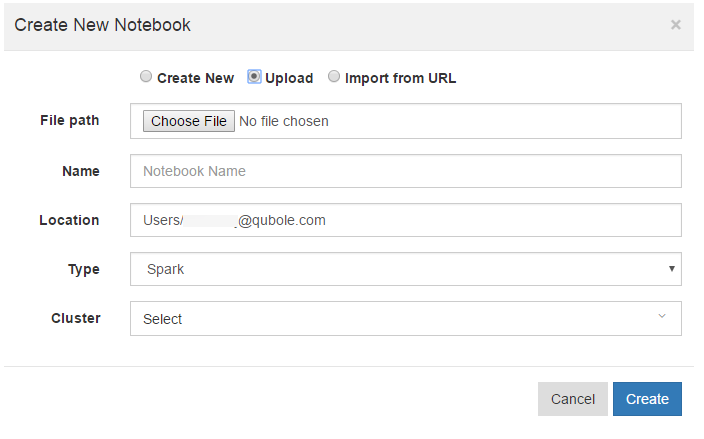
Select the Upload option. The corresponding text fields are as shown in the following figure.
In File path, click Choose file to browse to the notebook’s location. After you select the notebook (saved as JSON or ipynb), the notebook’s name is automatically populated. You can edit the notebook’s name.
Location shows the current user’s last-visited folder. Qubole provides a visual location picker to set the location. The two illustrations in Creating a Folder show the visual location picker with the default location and top-level folders.
Select the cluster type from the Type drop-down list, and assign a cluster by selecting it from the Cluster drop-down list.
Click Create to upload the notebook to the Qubole account.
Importing a Notebook
You can import Zeppelin (JSON) or Jupyter (ipynb) notebooks into your Qubole account by using a valid JSON or ipynb URL.
Note
Importing a notebook is only supported from an unauthenticated URL.
You can use any of the following URLs to import the notebooks:
Link to a notebook that is saved on any cloud storage.
Raw Github link to a notebook that is saved on Github.
Link to the Gist created from the Github notebook.
Note
Importing a notebook with a link to gcs is currently not supported due to the additional Google authentication requirement from Google. For more information, see Accessing public data.
Prerequisite
You must ensure that the following requirements are met before importing a notebook.
The object in a cloud storage or Github is public.
Steps
Click +New in the top of the left navigation pane. The Create New Notebook dialog box is displayed.
Select the Import from URL option. The corresponding text fields are as shown in the following figure.
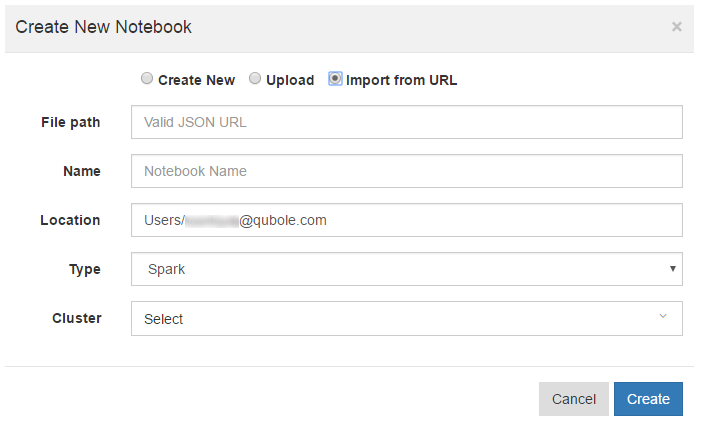
In the File path, enter the location of the notebook that is a valid JSON or ipynb URL. After you enter the URL, add a name to the notebook that is being imported.
Location shows the current user’s last-visited folder. Qubole provides a visual location picker to set the location. The two illustrations in Creating a Folder show the visual location picker with the default location and top-level folders.
Select the cluster type from the Type drop-down list, and assign a cluster by selecting it from the Cluster drop-down list.
Click Create to import the notebook into the list of notebooks on the Qubole account.
Configuring a Notebook
To configure an existing notebook, click the settings icon to see the list as shown in the following figure.

Click Configure. The Configure Notebook dialog is displayed as shown in the following figure.
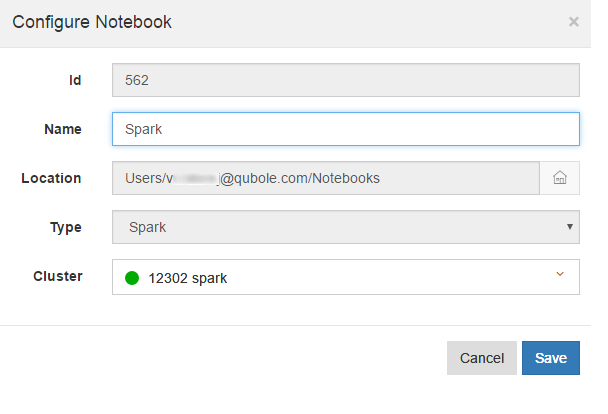
You cannot change the cluster type and location. Change the name or the assigned cluster by selecting the one from the drop-down list if any. You can change the cluster associated with the notebook only when the notebook does not have any active command or active schedules associated with the notebook. You can also change the name by clicking the name on the header as shown here.

Cloning a Notebook
You can clone a notebook if you want the same settings. Select a notebook and click the the settings icon to see the list as shown in the following figure.

Click Clone. The Clone Notebook dialog is displayed as shown in the following figure.
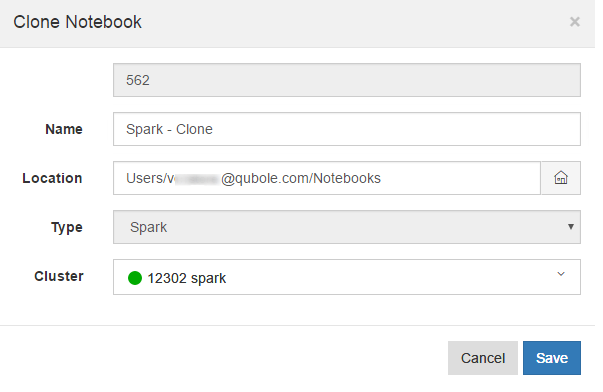
You can change the name of the notebook and its assigned cluster.
Location shows the current user’s last-visited folder. You can click the home icon to select the home directory.
Linking a Notebook
To link an existing notebook to the GitHub profile, click the settings icon to see the list as shown in the following figure.

Click Configure GitHub Link and you can see the dialog to add the repository, branch, and path details. Click Save after adding the details. See GitHub Version Control for Zeppelin Notebooks for more information.
Tagging a Notebook
You can tag a notebook that can help in tracing it from a list of notebooks. There is one tag label on the top-left of a notebook. Do a mouse hover on the edit icon and you can see a Edit label as shown in the following figure.

Click the edit icon and type a tag. You can type more than one tag to a notebook. The two actions are illustrated in the following figure.


After adding tags, click the tick-mark symbol icon to save a tag. A tagged notebook is illustrated in the following figure.

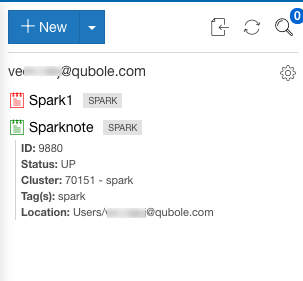
In the notebook list, click a notebook to see its tag details as illustrated in the following figure.
Filtering a Specific Notebook from a List
If you want to see a specific notebook from a list of notebooks, click the filter icon in the left pane. The filter is displayed as shown in the following figure.
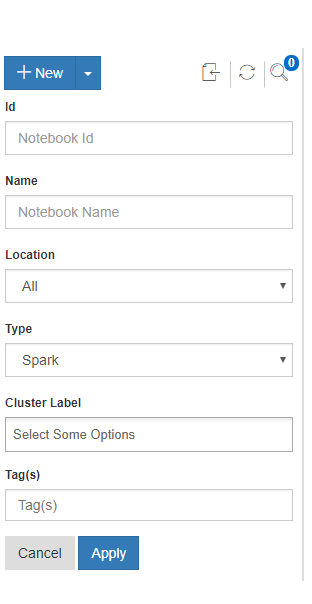
Type the notebook ID, name, location, cluster type, cluster label, or a notebook tag to filter it from the list. You can also specify a comma-separated notebook IDs to search. Click Apply for applying the filter. Click Cancel if you do not want to use the filter.
Click Refresh List for refreshing notebooks’ list. Click the filter icon if you do not want to see the filter fields.
Viewing the Permalink of a Notebook
To see the permalink of a notebook, click the the settings icon to see the list as shown in the following figure.

Click Permalink. The permalink of the notebook is displayed.
You can also view the permalink of a notebook by clicking the settings icon (gear icon) within a notebook and click Permalink from the drop-down list.
Deleting a Notebook
Before deleting a notebook, you must ensure that the notebook does not have any active command or active schedules associated with the notebook.
To delete a notebook, click the the settings icon to see the list as shown in the following figure.

Click Delete. A dialog is displayed to confirm if you want to delete the notebook. Click OK to delete it or Cancel if you want to retain it.
You can also delete a notebook by clicking the settings icon (gear icon) within a notebook and click Delete from the drop-down list.
