Connecting to a Custom Hive Metastore
This section covers the following topics:
Creating a Custom Hive Metastore describes how to create a custom Hive metastore from the very beginning.
Note
AWS Glue Data Catalog in QDS describes how to use AWS Glue Data Catalog as an external metastore for Hive and also sync the data from the Hive metastore to AWS Glue Data Catalog.
Connecting to a Custom Hive Metastore (AWS)
Note
If you face any intermittent lock or dead lock issues, see Intermittent Lock and Deadlock Issues in Hive Metastore Migration to resolve them.
Qubole allows you to configure a custom Hive metastore outside of QDS and access it through QDS. However, this feature is supported only for MySQL type of metastores.
Note
On QDS, you can either use Qubole Hive Metastore or connect to an external metastore. Qubole does not support using both the metastores at the same time.
Qubole provides these two ways to secure metastores:
Whitelist Qubole’s tunnel server in metastore, which requires you to only whitelist a specific port. After whitelisting, the metastore port is accessible through Qubole’s tunnel server.
Bring up metastore in a private subnet in a VPC. The VPC must be accessible through a Bastion node in the public subnet of the same VPC. In this case, the metastore can be accessed only through the Bastion node. To provide the metastore access to Qubole, whitelist Qubole’s tunnel servers in the Bastion node for port 22. Qubole uses an SSH tunnel to access the metastore through the Bastion node.
When Bastion Node is enabled, QDS supports account-level custom SSH keys in the metastore. To add the custom SSH keys, create a ticket with Qubole Support.
Note
This feature is not enabled by default. To enable it, create a ticket with Qubole Support.
QDS also supports connecting to a custom Metastore through the REST API that is described in Custom Metastore API.
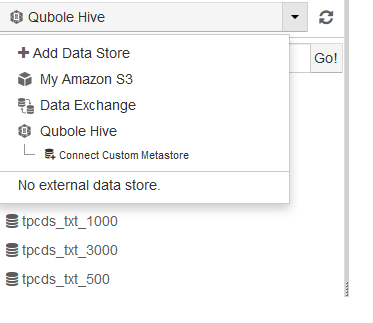
After this feature is enabled, on the Explore UI, you can see the Connect Custom Metastore option as shown here.

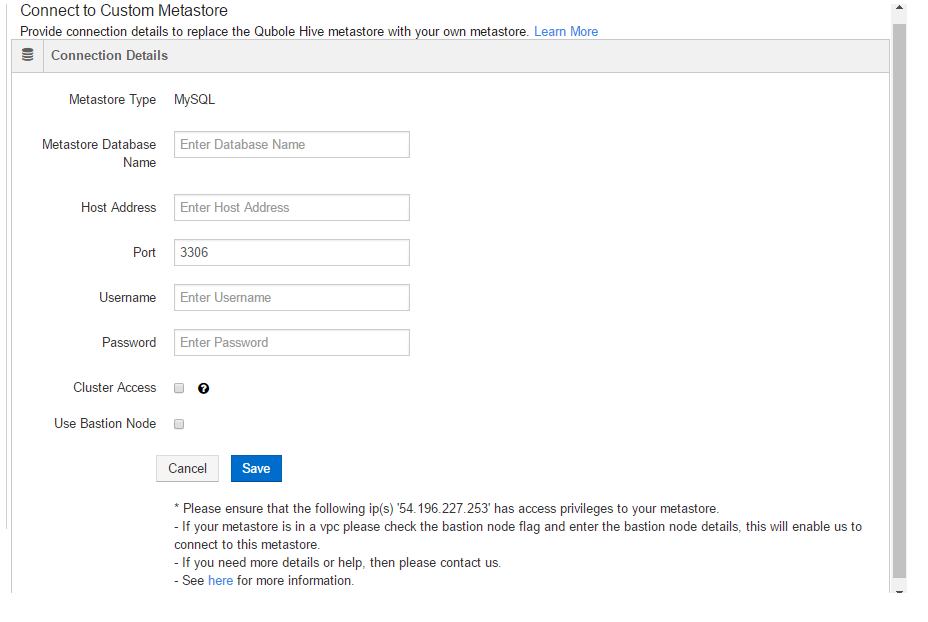
Clicking the option displays the Connect to Custom Metastore page as shown here.

Perform these steps to connect to the MySQL metastores:
Note
You must be a system administrator to connect to a custom metastore and after this feature is enabled, you can connect to a custom metastore. If you do not connect, Qubole-managed Hive metastore is available.
As a pre-requisite, ensure that the whitelisted IP addresses listed in Tunneling with Bastion Nodes for Private Subnets in an AWS VPC have access privileges to the custom metastore based on the QDS environments in which you have the QDS account.
Pull down the drop-down list that defaults to Qubole Hive and choose Connect Custom Metastore.
MySQL is set as the Metastore Type and (this field is non-editable as custom metastore is supported only for MySQL metastores).
Enter the Metastore Name.
Enter the host address in the Host Address text field.
Enter the port number in the Port text field to change the default port 3306.
Enter the username of the host in the Username text field.
Enter the password of the host in the Password text field.
There are four mechanisms on how QDS and clusters communicate with metastore. Use the most suitable option per your requirement.
If you select only the Cluster Access check box, all clusters communicate with the metastore directly. Before you enable direct cluster access, make sure all the clusters have a connectivity with metastore. Restart the clusters after enabling this check box.
If you select only the Use Bastion Node check box, QDS communicates with metastore from QDS via bastion. This option is used in case metastore is not available over the internet. So the communication happens through the bastion node available on customer’s VPC.
If you select both Cluster Access and Use Bastion Node check boxes, cluster communicates with metastore directly instead of via bastion node.
If you don’t select any of these check boxes, it is expected that the metastore is available over the internet and QDS can connect the metastore using the configuration provided by the user.

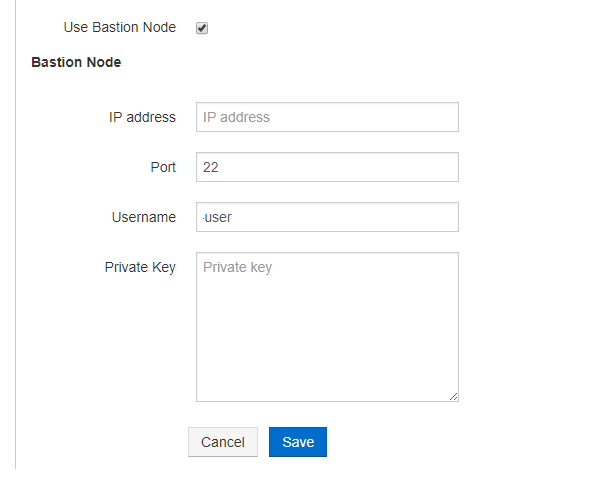
Under Bastion Node:
Enter IP address or hostname in Public IP/Hostname.
The default port is 22 and you can set a non-default port to access the data store through the bastion node.
You can edit the user name if you want to change the default user name.
Add the private key. This step is optional. If you add the private key, you must add the associated public key to the bastion node as described in Configuring a Cluster in a VPC with Public and Private Subnets (AWS).
Note
To add the non-default Bastion user/port, create a ticket with Qubole Support.
After adding the values, click Save to connect to the custom metastore. You can click Cancel if you do not want to connect to the custom metastore. After the connection is established, you can see that specific custom Metastore in the Explore UI.
You can edit the custom metastore details in the Explore UI.
Note
Migrating Data from Qubole Hive Metastore to a Custom Hive Metastore described how to migrate the data from the Qubole-managed Hive metastore to the custom-managed Hive metastore.
Connecting to a Custom Hive Metastore (Azure and Oracle OCI)
Prerequisite
The metastore must reside on a MySQL database; this is the only type of database QDS supports for this purpose.
Azure Recommendations
Qubole recommends that you use a custom metastore, and co-locate the metastore with the Hive client; this is to prevent latency issues. See also Connecting the Metastore to QDS.
Oracle Considerations
QDS provides a default Hive metastore, which may be satisfactory for your business purposes. If so, you don’t need to do any additional configuration. But you may want to use your own private metastore for reasons of security or performance; in this case, follow the instructions on this page.
Connecting to the Metastore
You need to connect the metastore to:
Your QDS Hive cluster; and
The QDS service itself
Connecting the Metastore to the QDS Hive Cluster
For Oracle OCI, configure the metastore in the same VCN you are using for your QDS clusters.
In the QDS UI (see step 3 below), check the Enable Cluster Access box.
Connecting the Metastore to QDS
Oracle OCI
You can configure QDS access to the metastore either through a Bastion node, or by whitelisting a private IP address.
To configure a Bastion node for QDS access, follow these instructions; or
To whitelist a private IP address, contact Qubole Support and provide the address to be whitelisted.
Azure
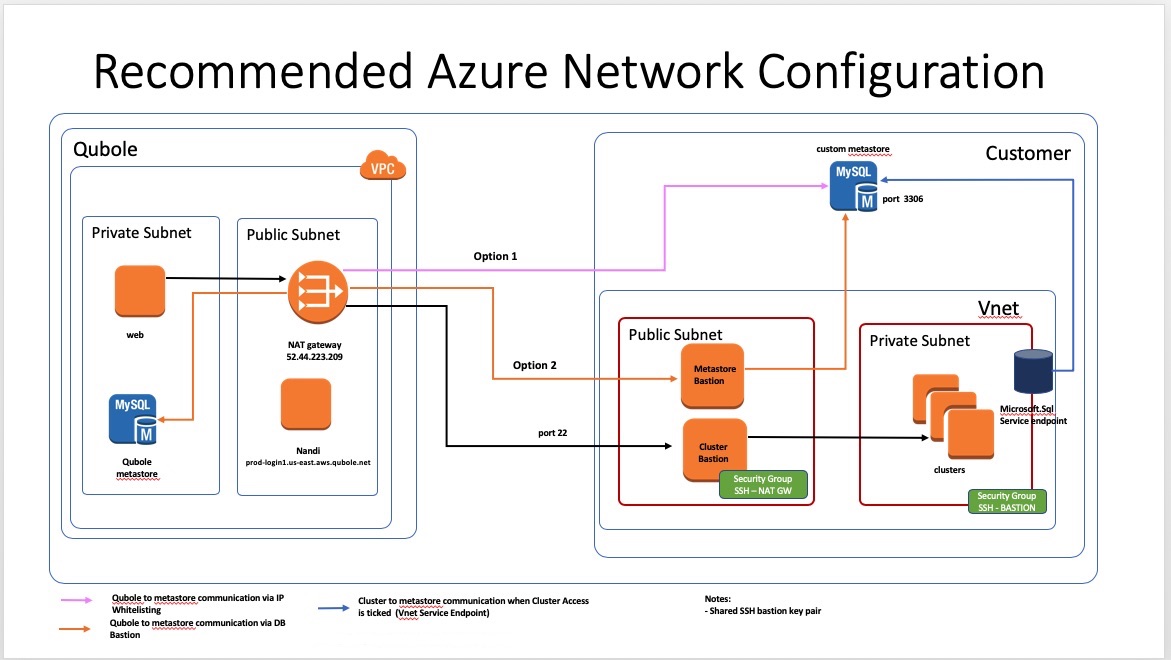
For Azure, the following connection methods are supported, though not all are recommended:
Connection using Qubole NAT whitelist and direct access via a VNET endpoint.
Connection using Qubole NAT whitelist and direct access via a private subnet.
Direct access using a private subnet and Bastion node.
Connection via a Bastion node.
Connection via Qubole NAT (Network Address Translation).
Of these, options 1-3 are recommended, and option 1 is preferred. Options 4 and 5 are not recommended because the extra hop from your network to the Qubole NAT may cause delays; and option 4 has the additional disadvantage of a sungle point of failure in the Bastion node.
Option 1 is preferred because:
It eliminates the Bastion single point of failure
It provides an additional layer of security, ensuring that only requests coming from approved Azure VNets will be allowed to a specific storage account:

Specifying Your Configuration in the QDS UI
From the QDS main menu, choose Explore.
On the resulting page, pull down the menu to the right of Qubole Hive and choose Connect Custom Metastore.
Fill out the fields as follows:
Metastore Database: provide the name of the MySQL database hosting the metastore.
Host Address:
If you are using a Bastion node, enter the Bastion node’s private IP address.
If you are whitelisting an address, enter the public IP address corresponding to the private IP address that you provided to Qubole support.
Port: Accept the default (3306).
User Name: Enter the name of the superuser or administrator user on the host you identified in the Host Address field.
Password: Enter the password for the superuser or administrator user.
Enable Cluster Access: Check this box to allow direct access between the QDS cluster and the metastore. Qubole recommends that you use direct access.
If you are not using a Bastion node, leave Bastion Node unchecked and click Save to save your changes; otherwise continue with step 5.
Check the box next to Bastion Node to enable access via your Bastion node.
Enter the public IP address or hostname of the Bastion node.
Enter the user name of the superuser or administrative user on the Bastion node.
Enter the private key corresponding to the Bastion node’s public key.
Configuring Thrift Metastore Server Interface for the Custom Metastore
HiveServer2 (HS2) and other processes communicate with the metastore using the Hive Metastore Service through
the thrift interface. Once HMS is started on a port, HS2, Presto and Spark can be configured with it to talk to the
metastore. It must be configured as: thrift://<host>:<port>. The port that is used for Hive Metastore Service
in Qubole Hive is 10000.
You can configure a thrift metastore server interface to access Hive metadata from the custom metastore in Hive, Presto, and Spark engines as mentioned below:
As a Hive bootstrap, set
hive.metastore.uris=thrift://<URI>:10000;.As a Presto cluster override, set
hive.metastore.uri=thrift://<URI>:10000.As a Spark cluster override, set
spark.hadoop.hive.metastore.uris=thrift://<URI>:10000.
Note
Qubole supports configuring the thrift socket connection timeout according to the required value based on the schema table count. To configure the thrift socket connection timeout, create a Qubole support ticket.